“The Duct Tape Method” DIY change tires motorcycle yourself without tools! How to
I double taped about 2-3 inches or so on about 16″ strips. So lay out long strip and cut a short piece and tape over it so the two sticky parts lay face together stuck together. Why? That’s the part you line up with the tire inner bead part. This way you can pull it out easily and fast after tire put on.
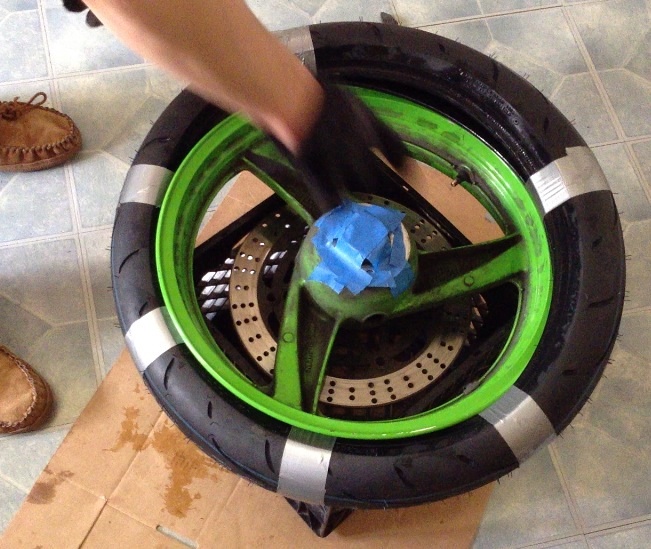
CLICK pic below to see my video here:
I taped the sticky long half under tire pressed two walls together – which is SUPER easy with the Q3. Mine was soft as butter after spending about 6 hours inside a normal temp apt. Did it with a finger and a thumb it’s so compliant.
Space those tape points roughly out the same. Then I used just a little dish soap and water mix around the tire and wheel half where I’d have to push.

I got it about 65% on and it started getting very tight. This is where I said in my head “there is no f-ing way this is gonna happen” But I made sure the already mounted portion was snug squarely in the center of the wheel and therefore its smallest radius. In fact I kind of man handled it pretty good and stuffed it and made sure it was snug in there. That made a big difference – even though it looked the same before, it wasnt. Smoosh that tire up in there inside that middle part of the rim!
Then I pushed on both sides of last 35% of tire and in about 30 seconds it just plop! Slid right over the wheel rim!
I was shocked that worked. Aired up a gas station to about 70 psi and got 95% of bead perfect in. 2nd to last bead I had to bounce a lot and more air to 70 and it POPPED in loud. Didn’t want to go higher air pressure and bounced it a lot, finally tossed in my car trunk with one last part not fully seated – although holding air just fine for now. About 25 minutes later it had seated itself perfectly. Aired down to 40 lbs and voila! New tire!
(The old tire I chopped up a lot before breaking the bead – not good. Not recommended, break bead fully first! Although by slicing through one entire sidewall and having 2 separate parts I was able to dismount the tire with my bare hands and not much force. This is coming from the guy who can hardly center stand this bike so I’m not the most ripped person on earth I’ll tell you that! Think computer user body build). No irons no spoons NO rim damage!
Finally broke both beads on the front tire. Was at it 1-2 hrs. So before I forget, I’ll post tips.
I borrowed two craftsman bar clamps with the squeezy grips. Another C clamp style one was worthless. These two is what I needed. The 8″ wooden angle changing one that Pengaru has in the tire change DIY sticky would be a lot better.
Set both clamps about 4-6″ apart on wheel. I tried and tried and tried. Was about to give up. And I recalled how I chopped through rear tire. 
So I sawed horizontal cut through front tire, and was able to push in tire. And I coated inside it up a lot with water and soap and that’s what finally enabled me to break it free, lubing inside bead and tire area. If you have trouble with clamps do that and it will help a lot.
I didn’t have an easy ability to make the wooden 2×4′ eight foot lever using a car thing, next time I’d prefer to try that or get the wooden clamp. This method was a lot of grief.
(I couldn’t push this one off like the rear, wasn’t even close to going. Tried clamping sidewalls together and that’s closer but not close enough.)
Wow, getting old tire off and new on was easy! Not really harder than rear wheel.
I used DUCT TAPE again to get old tire off and new one on. No extra cutting.
Now just need to air up

Edit: I put the f ing tire on the wrong direction this time. I was so pissed.
I just had to completely redo it BUT it did go smooth once re duct taped it again AND I shot a video of it this time. Should not have forgotten to check direction. But at least its on and right direction.
I’ve just slipped both sides together off the rim with duct tape. A milk crate underneath works great for protection.
(I did remove the right rotor but don’t real need to if you’re careful. Next change I won’t bother).
This is how I duct taped the tire beads together to slide it off the rim (didn’t take a ‘before’ pic).
I did actually use a small zip tie to fish the first piece of duct tape between rim and tire. After first tape piece is in its much easier with more space to work. Notice hacksaw cut for applying inner lubricant for breaking the bead step earlier.

The brand new tire all taped up and ready to try installing. This was my first attempt on a front wheel ever and it went on a lot easier than I thought. I recommend duct tape because its a wider band and will potentially cut less into new tire than a zip tie, not scratch rims like a lever could and most people actually have duct tape on hand!

I made my own little wheel balance station like this below. I leveled (with a level) side to side and front to back two milk crates on a small table and then used the actual axle to mount the wheel and spin the wheel. It’s more like you try to find the heavy spot, and raise it from the bottom up 90 degrees to a 9 or 3 O’clock type position (horizontal heavy part on wheel down), and let it fall. Keep adding weight until is does not spin down at all. I used very strong magnets for this to the rim, adding 1 at a time.

I wound up being 1.3 oz out of balance on the rear wheel, and fine on the front wheel and made no adjustments there. About a month and, um 1200 miles later, finally got peel and stick wheel weights and installed 1.3 oz on rear wheel where I had marked it with tape.
Posted in DIY, repair and tagged change tires, duct tape method, no tools, Zx6e, zzr600 by green