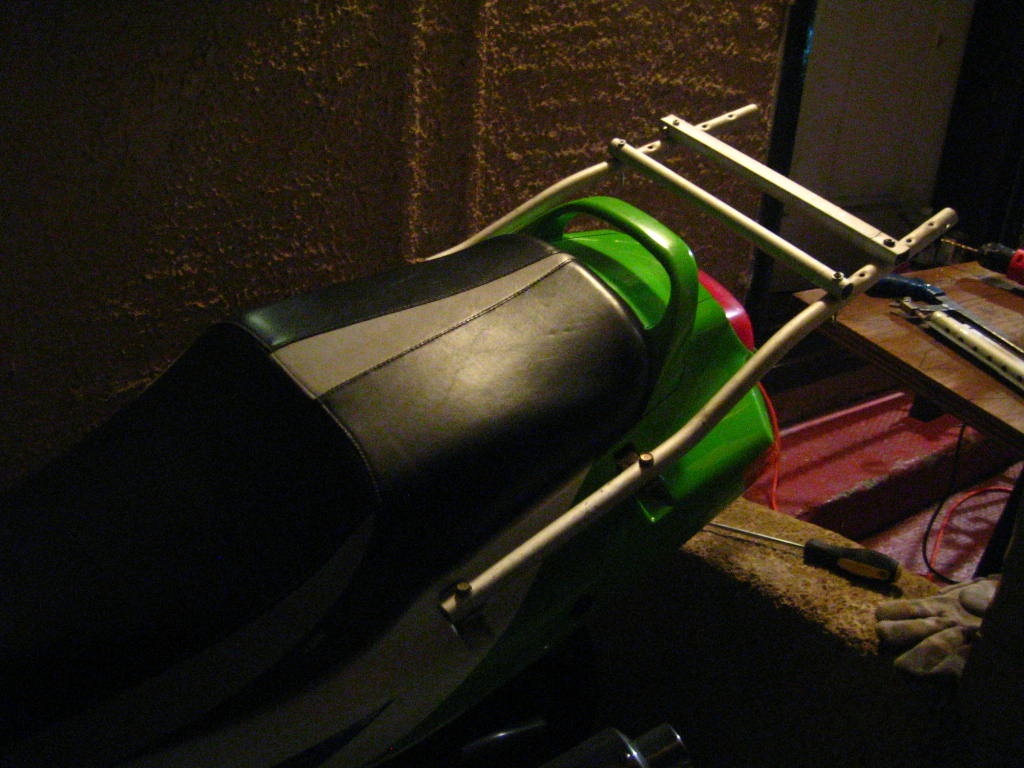
Just fabricated DIY rear luggage rack from a crutch!

 Had this zany idea to try to make a rear rack for my kawasaki zx6e out of crutch parts before, after seeing several in swap shops on the east coast…
So what do I walk by the other day? A discarded free aluminum crutch on the curb.
Started it a few days ago, and then got inspired to change my design tonight and use angle brackets to get the long side tubes closer to the bike and fairings to reduce torque stress.
Planning to add a third rail on the rear very soon. If I had made precise cuts of the crutch beforehand I would have had enough lengths for 3 crossbars but I was cutting conservatively, making several cuts and refining lengths as I was not sure how long the final version should be. Pretty fun project. It bolts into stock bungee mount holes using the stock bungee bolts – that came about as an intentional change for the original design idea with spacers.


Raising the mount points higher up makes the clearance on the fairing more confidence inspiring. If you simply go straight out with a really long custom M6 1.0 pitch bolt
a ) they are hard to find that long
b ) there is a lot of extra torque farther out on the bolts and the subframe mounts
c ) most worrisome is the long bars are a lot lower, almost sitting on the fairing, and I just thought of this setup under load and with bumps and flexing how the fairings could easily get damaged and scratched.


Front mount. You really want to max height to better meet the naturally higher rear mount points in the subframe but not mash into the fairing. I popped the crutch plastic plugs back in for a little less sharp forward edges.


Posted in Uncategorized by green
Yo! We got that B Roll!, Or how to get paid $800 to ride your E
It was the best of times it was (almost) the worst of times…. Read on reader.
As the title suggests I did in fact get paid handsomely to ride my E 100 miles yesterday in lovely 62 weather. Weather so warm and with my activities I was sweating most of the day after taking the liner out of jacket, and down to T shirt, nylon synth Long sleeve and Frank Thomas unlined jacket. So amazing right? Couldn’t be better?
Does playing chicken with a BMW in his lane sound like a good idea?
So what is this B Roll you ask? If you don’t know that phrase allow me to introduce you to this guy:
(I did not shoot this video in the link, I just love the video).
Link:
http://m.youtube.com/watch?v=SItFvB0Upb8

——————–
G.M. Riding again!
So for start of trip I had to watch weather closely for a week to plan trip into SF. It had to be sunny or mostly sunny to match footage we shot earlier for a TV episode. I took my chance yesterday with first 50/50 cloud sun mix predicted in over a week.
I also had to stuff a camera that costs 7X what i paid for Green Magic in a used set of TourMaster saddlebags that I had never figured out to mount right. And a bunch of other crap like extra batteries, charger, new gopro that refused to work later for fun ride, water, layers etc in other bag and full tripod. Ad my phone toasted itself a week ago so no phone. I’m used to riding always with one now just in case.
I zipped out of Oakland in fog and clouds over super foggy bridge and into sunshine and the Golden Gate park!
Then on to Ocean Beach to get, you guessed it, B Roll shots of beach and views up by the Cliff House.

A closer shot of bags set up. Apparently I mount them backwards, but they fit better that way. If I try to mount under seat they will almost certainly hit the pipes. And melt?? So I put em backwards and slide them forward to rest on the passenger footpegs. I have camera squashed into this bag.

So the good:
Beautiful weather – escaping east coast winter
Paid riding time, bike working
Pretty areas.
Shooting solo, self directed, no silly know nothing producer with me telling me what to do. (Which can happen from time to time on shoots).
Route 1 afterwards for fun to Stinson beach, currently my favorite twisties anywhere. They are sick.
Got all the shots requested and they came out great.
Not so great:
Stressful with that much valuable gear with me in new untested gear. Hwy speeds, heavy cornering etc
Had to constantly get off bike, pull cam and strapped tripod set up shoot and put it all back together and repeat over and over. Not really a joyride. Shooting often with helmet on so didn’t have to pop off seat and jam helmet behind bag to lock it. I’m sure I looked sensible on the beach wearing a helmet getting B Roll of surfing.
$300 goes to camera and gear.
The worst fog I ever hit riding Golden Gate Bridge at rush hour. You could see nothing. Water and fogged up glasses and shield. Nearly riding blind in stop and go traffic over bridge.
Rush hour Bay Area return. It’s f ing awful. At least it’s legal to split lanes if not stressful.
Slow time of year. Only booked 2 days in last 3 weeks.
And about chicken…
I did route 1 to the Pelican Inn and back 2 full loops. Returning to go home after cranking turns I hit a corner going at quick but not fast fast pace. Said corner had water and dirt all over it. I immediately locked up both wheels and went into skid. I quickly got off both both brakes, stood the bike up straight, crossed the double line completely into oncoming lane for maybe 150 feet. While I had right foot down to hold bike up and try to fully recover before I dared ease the bike back into my lane. I could see a car had been approaching and was about to come around huge corner.
The BMW had to slow down after his blind corner and seeing me completely in his lane. Needless to say he look surprised. I more or less had to force him to brake (fortunately he was going slow anyway) and out of his lane or both. Thanks guy, a cager who wasn’t a dick.
It was a pretty scary event. If I had kept on brakes or tried to force bike into my lane I definitely would have downed bike and either slid into car or off the road and crossed in front of him into hill banking. I do know I really shouldn’t have been on brakes at all into a turn. Kind of lazy probably stupid end of long day not 100% focused riding in slower easier turn area. Dumb.
Below: Pic of turns and fog bank that chased me out of Stinson and back up the ridge on route 1. The whole fog bank kept me out of final approach into Stinson beach with horrible visibility and followed me back up the mtn ridge off the turns a little earlier than I wanted.

Posted in Uncategorized by green
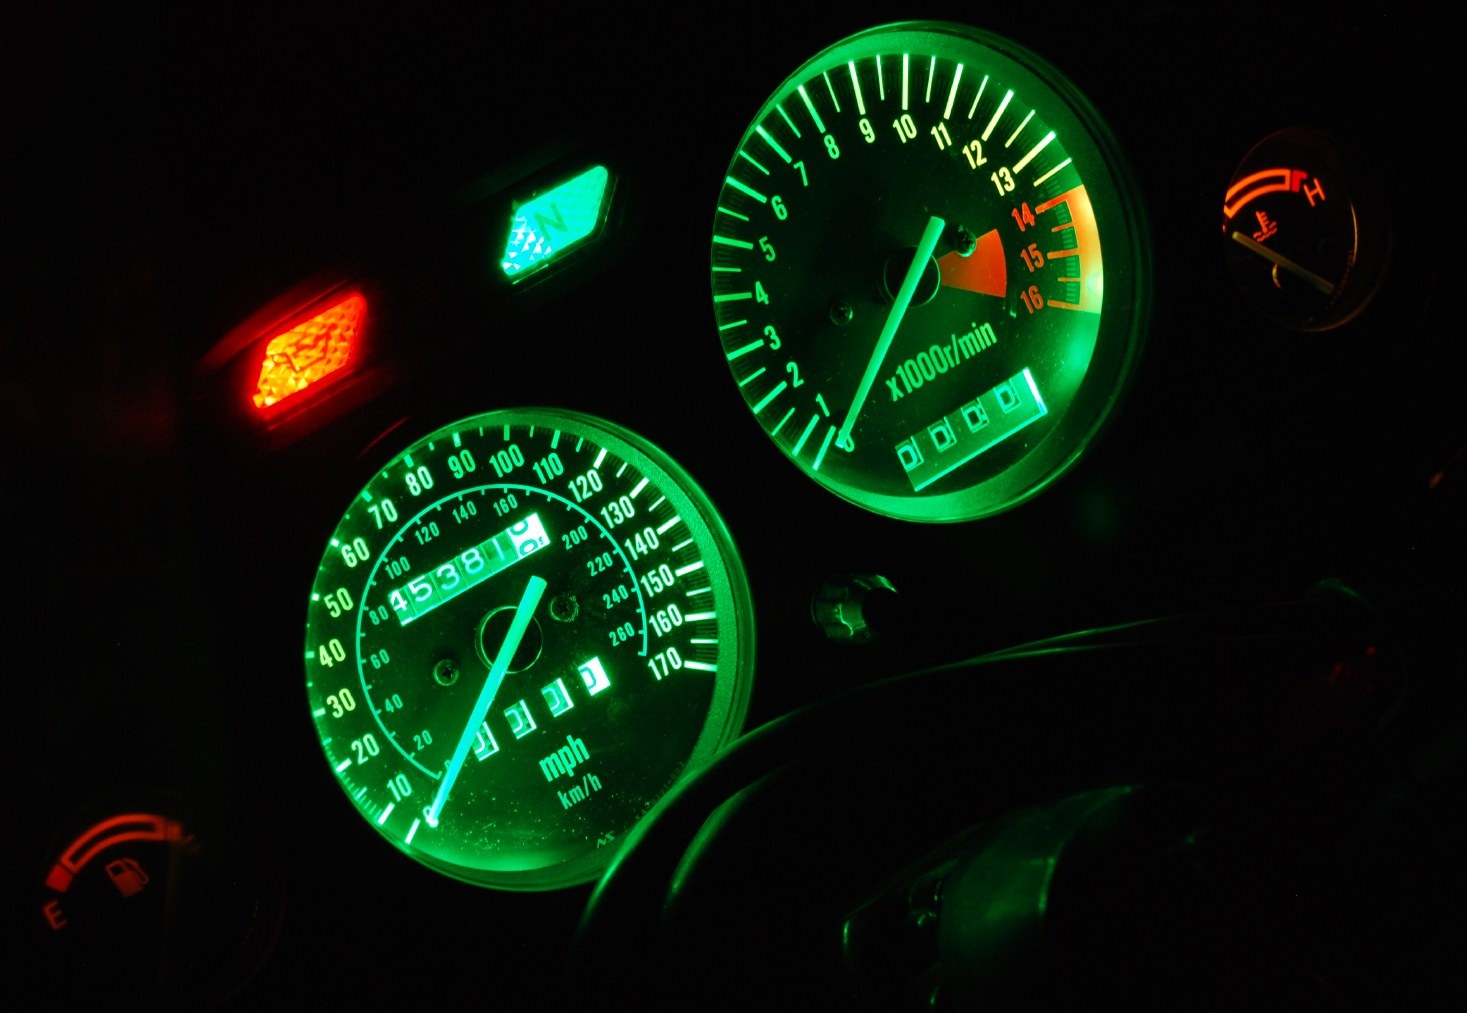
Just did SMD 5050 green LED dash swap! Finally installed ram air tube guards.
 Removed gauge cluster quickly. And then got bogged down with installing the ram air tube guards. They have been missing since I bought the bike and I got these spares from a parts bike awhile back. Had to remove the entire front nose fairing and headlight off the bike to get them in the fit is so tight.
Anyway back to lighting. I bought a single SMD 5050 green LED strip some time back and finally got the time to work on it.
Also got interrupted by phone calls, and having to pick up production gear for a shoot on monday. Grrrr.
Resumed work after moto ride to berkeley be had to re put back in pulled gauges. Driving 60 Mph on fwy with no windscreen at all isn’t as bad as you might think.
I got the tach threaded and then the speedo with a lot of small custom solutions with spare wire and rubber protectors. When I put it all back in, the speedo strip wasnt lighting at all. Took awhile for me to figure to diagnose it with a AC / DC wall wart inside instead of constantly on and off the bike.
I discovered my new soldered wires to the cut factory strip were not working at all.
So Sat am back to work, read about “tinning” the wire and circuit ends first then joining w solder. And that worked great! Now they both light and are much brighter and custom green to boot.
_________________________
Step 1: remove windscreen, and inner gauge plastic dash surround cover, just two screws to remove that part. (Your bike should not look this dirty). 
Step 2: unbolt these two bolts to free up gauges. Do not unbolt upper ones, this whole unit comes out a lot easier with removing the (2) lower 10mm bolts, I’m pointing to left side one.

Detach two electrical leads shown to the gauges, and also the speedo cable that I’m pointing to. The whole thing is now free to lift out.

SMD 5050 strip that I soon cut in half shown also:

So from the backside, locate one of the bulbs that lights up the tach or the one for the speedo and pull out the rubber seal with bulb. You’ll want to tap into the 12V

Next – unscrew the clock faces, just the two little screws so you can have the room you need to wiggle in the SMD strip. I leave the faces loose but don’t remove them.

Here’s the SMD strip wrapped around the tach now. I attached a wire into the bulb holder, passed the wires through the opening and pulled them down to the bottom of gauge area. The black and grey wires are back fed through the stock bulb openings. I wired these extra wires into bulb socket and then attached them to the LED strip leads.

Here’s the wires I fed into the bulb holder, I had some extra car stereo connectors and used that, and then jammed a piece of plastic in between the leads to isolate them from each other. I then stuffed the rubber socket holder back into the back of the gauge cluster to keep it watertight. I can also go back to stock bulbs if I want to this way.

Close up on the speedo and strip tucked behind it.

Here’s the tach plugged in and running!
It’s not too bright at all, just right I am guessing. I don’t think I’d want it any darker so the 5050 SMD extra bright really helps. The super bright green outer circle will be covered up with the gauge plastic cover.
The gauge plastic covering is off and it’s not bolted back in. (I had a problem with the speedo one, apparently my soldering of the cut other half of the strip did not go well). It looked good but won’t pass 12V down it. Hmmm.

Sweet! I just got speedo strip 2 working. I “tinned” the wire first w solder and let it cool and used the factory end of the LED strip where it had been “tinned” at factory and pressed them together and added more solder and voila! Full install pics and nighttime matched exposure picture coming later.
Here’s the installed new dash gauges. The green is a really rich nice green to the eye. Same exposure as first picture. 1/2 second shutter, ISO 400, lens f5.6 , 55mm zoom, I only slightly modified the White Balance to make it a little greener as it looks to the eye.
Comparison to my (crappy) stock old lighting. Note the speedo bulb was in fact burned out, so that upper area would have been a little brighter as stock.

Posted in DIY and tagged gauges, LED, SMD, swap, upgrade, Zx6e, zzr600 by green