Just did SMD 5050 green LED dash swap! Finally installed ram air tube guards.
 Removed gauge cluster quickly. And then got bogged down with installing the ram air tube guards. They have been missing since I bought the bike and I got these spares from a parts bike awhile back. Had to remove the entire front nose fairing and headlight off the bike to get them in the fit is so tight.
Anyway back to lighting. I bought a single SMD 5050 green LED strip some time back and finally got the time to work on it.
Also got interrupted by phone calls, and having to pick up production gear for a shoot on monday. Grrrr.
Resumed work after moto ride to berkeley be had to re put back in pulled gauges. Driving 60 Mph on fwy with no windscreen at all isn’t as bad as you might think.
I got the tach threaded and then the speedo with a lot of small custom solutions with spare wire and rubber protectors. When I put it all back in, the speedo strip wasnt lighting at all. Took awhile for me to figure to diagnose it with a AC / DC wall wart inside instead of constantly on and off the bike.
I discovered my new soldered wires to the cut factory strip were not working at all.
So Sat am back to work, read about “tinning” the wire and circuit ends first then joining w solder. And that worked great! Now they both light and are much brighter and custom green to boot.
_________________________
Step 1: remove windscreen, and inner gauge plastic dash surround cover, just two screws to remove that part. (Your bike should not look this dirty). 
Step 2: unbolt these two bolts to free up gauges. Do not unbolt upper ones, this whole unit comes out a lot easier with removing the (2) lower 10mm bolts, I’m pointing to left side one.

Detach two electrical leads shown to the gauges, and also the speedo cable that I’m pointing to. The whole thing is now free to lift out.

SMD 5050 strip that I soon cut in half shown also:

So from the backside, locate one of the bulbs that lights up the tach or the one for the speedo and pull out the rubber seal with bulb. You’ll want to tap into the 12V

Next – unscrew the clock faces, just the two little screws so you can have the room you need to wiggle in the SMD strip. I leave the faces loose but don’t remove them.

Here’s the SMD strip wrapped around the tach now. I attached a wire into the bulb holder, passed the wires through the opening and pulled them down to the bottom of gauge area. The black and grey wires are back fed through the stock bulb openings. I wired these extra wires into bulb socket and then attached them to the LED strip leads.

Here’s the wires I fed into the bulb holder, I had some extra car stereo connectors and used that, and then jammed a piece of plastic in between the leads to isolate them from each other. I then stuffed the rubber socket holder back into the back of the gauge cluster to keep it watertight. I can also go back to stock bulbs if I want to this way.

Close up on the speedo and strip tucked behind it.

Here’s the tach plugged in and running!
It’s not too bright at all, just right I am guessing. I don’t think I’d want it any darker so the 5050 SMD extra bright really helps. The super bright green outer circle will be covered up with the gauge plastic cover.
The gauge plastic covering is off and it’s not bolted back in. (I had a problem with the speedo one, apparently my soldering of the cut other half of the strip did not go well). It looked good but won’t pass 12V down it. Hmmm.

Sweet! I just got speedo strip 2 working. I “tinned” the wire first w solder and let it cool and used the factory end of the LED strip where it had been “tinned” at factory and pressed them together and added more solder and voila! Full install pics and nighttime matched exposure picture coming later.
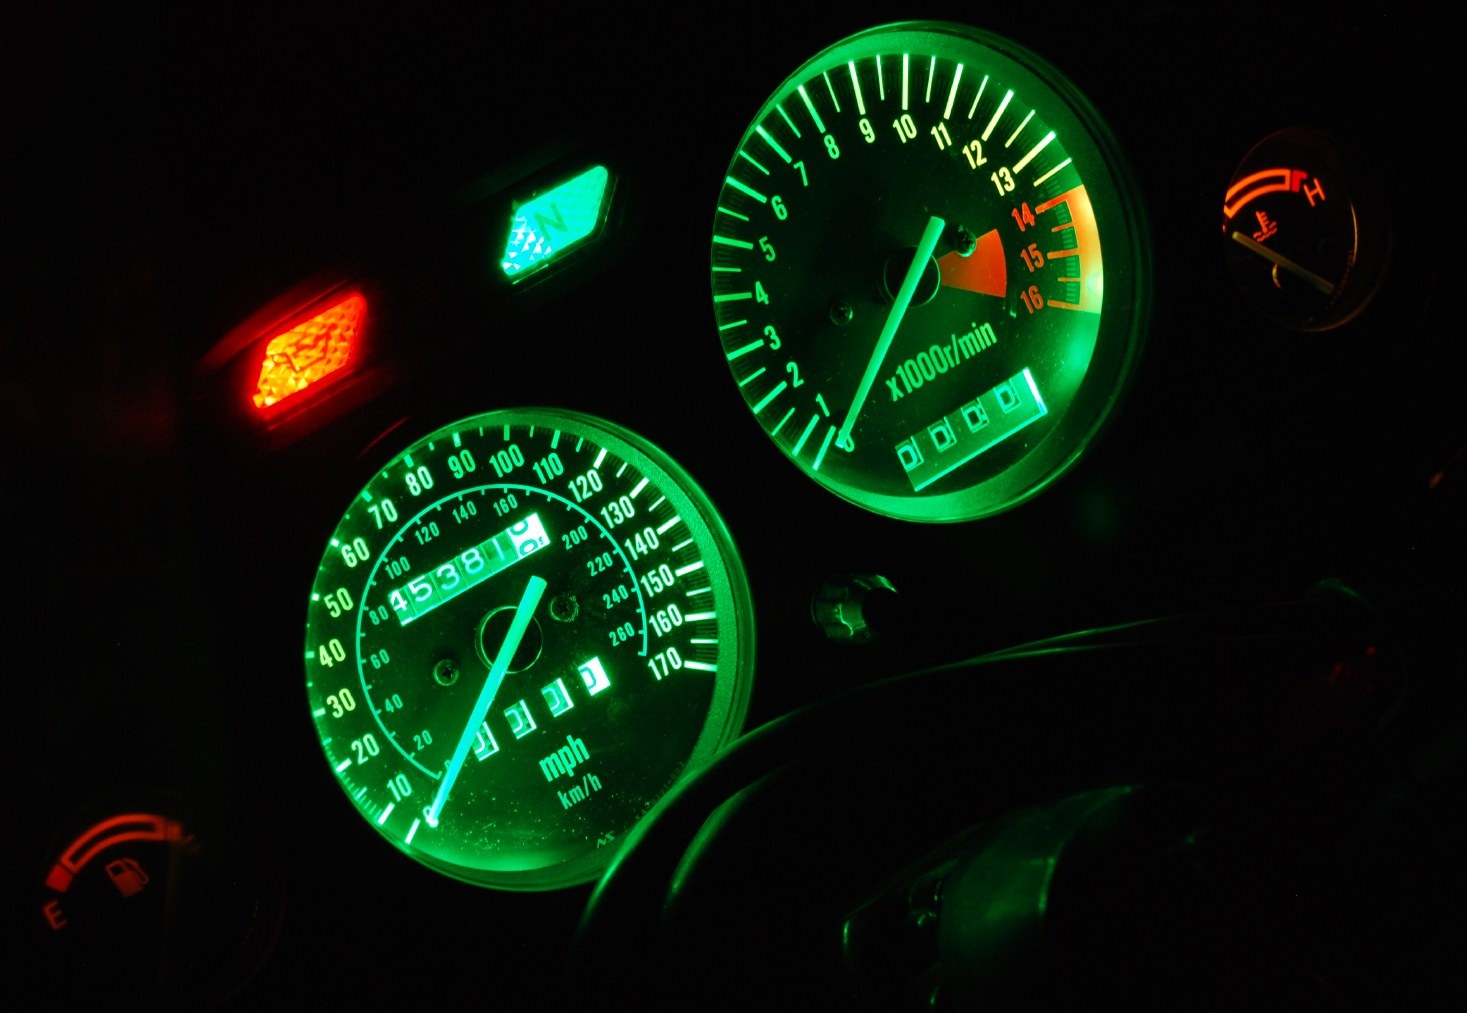
Here’s the installed new dash gauges. The green is a really rich nice green to the eye. Same exposure as first picture. 1/2 second shutter, ISO 400, lens f5.6 , 55mm zoom, I only slightly modified the White Balance to make it a little greener as it looks to the eye.
Comparison to my (crappy) stock old lighting. Note the speedo bulb was in fact burned out, so that upper area would have been a little brighter as stock.

Posted in DIY and tagged gauges, LED, SMD, swap, upgrade, Zx6e, zzr600 by green