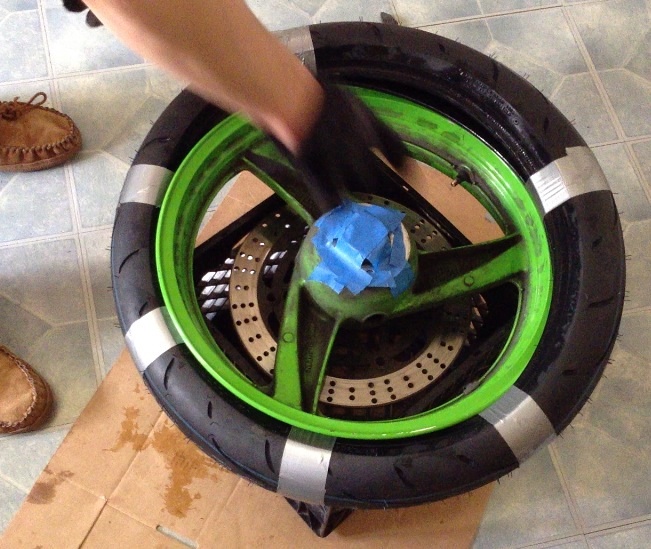
ZX10R ’06 rear caliper brake swap!

Mileage: 47,292
Yesterday I just changed out my ’95 stock caliper to a 2006 ZX10R. It’s a direct swap. No mods needed. (Other years of similar era would work too, just check).
Although same lackluster performing caliper they are easier to find, cheap, newer, as quite a few 10 owners upgrade and have them laying around. Had to change pads anyway, and this was almost priced as same price as pads alone.
I bought the entire unit for $40 with about 6K and almost no use (off ex-race champ who never brakes with rear except trail braking). It had been upgraded to steel Galfer line, EBC sintered metallic pads. Came with brake piston cylinder, lines, reservoir, brake lever, clip on, and fluid all still attached with piston freely moving.
Some interesting things happened. Was going to try to swap everything, but found even though the brake cylinder looked identical with same number on front, it has a different part number stamped on the back. And it’s length to the pivot on the foot brake lever is shorter by about 1/2″ or more. I was going to try to use it anyway, figuring it was newer, but I also realized I’d have to mess with the brake light sensor unit and change its length on the collar if I could etc etc…. And at 9pm at night wasnt wanting to make it a longer project. Basically if you just bolted it in as is, the foot brake lever would drop lower, and have less travel to brake, and the brake light would probably be on the whole time unless you adjuster that plastic sensors length (it clearly is adjustable but how far and which direction I did not experiment with after deciding to keep my stock cylinder, upper hose,mand stock upper reservoir.
In fact, the caliper is listed as a different part number but fits no problem. The pads are identical to both ZX6E and ZX10R 2006 era and other years.
The Galfer steel brake line was quite long, and I had to flip over both banjo bolt ends
As they seemed to be angled wrong.
The upper reservoir looked the same, but looking closer the feeder at bottom was in reverse position, and then I noticed it had upper and lower markings on both sides! So although its different Kawi probably had it doing double duty in multiple bikes. The brake hoses are wider gauge on the E stock unit all around compared to the ZX10R.
So in summary, easy caliper and pad swap out, no problem at all. Everything interchanges and mixes and matches perfectly. Brake works great now too! Lots of bite in back now.
Lines and banjo bolts all match and bolt threads etc…
The ZX10 brake cylinder could I feel be used – it has identical bolt in position and pattern to footpeg brackets. But you’d probably have to lengthen the pivot bolt by loosening the nuts and extending the pivot down (I did that in fact but stopped the install due to other reasons.)
The upper reservoir could be used with zx10R hoses to cylinder if all off same bike, but you would probably either have to mount it backwards up top, and have the angle of the outlet at bottom pointing slightly the wrong way or better yet just make a metal extension piece to keep the reservoir facing the way the E wants it, it would be like a 3 or 4 inch piece with a mount spot.
ZX10R complete setup as purchased in pic below.

Original stock unit before replacement. Pads totally shot.

Posted in DIY and tagged caliper, rear brake, upgrade, ZX10R, Zx6e, zzr600 by green
Oil change #2 46,931 miles. Epoxy stator cover.
Oil change today and while there finally trying to stop the one drop of oil a day coming out of stator cover on teenie hole from p.o. lowside. Also for some reason riding w newer thinner boots its spraying a bit on them on the hwy which is making a mess and annoying. Didn’t on older lg work boots.
Planned to use JB weld but couldn’t find it. I found some Loctite quickset Epoxy. Two part plunger style kit. Says waterproof tight bond for metals, wood etc…
Not sure if that can take high temps around motor.
Drained oil and changed filter and will leave empty for a day. Used brake cleaner to clean outer cover and then epoxied hole.

Shot of leak area when I got the bike 2 years ago. You can actually see leak in above pic in the oil pool you can see hairline crack on right side coming out of pool.

For those interested, this pic is area cleaned and the crack as it is two years later and 4K. I don’t think its spread like I’ve read it can. It’s center frame on cover where two edges meet and you can see sun lighting up the tip of crack. Man, tiny but what a mess maker over time and miles. Sheesh. Bike is a dirty birdie all cause of this and you can hardly see it with the naked eye. Only under bike incredibly close staring at it.
Hope it bonds tight. Otherwise JB Weld next and then new cover.
Posted in repair and tagged JB Weld, Stator cover by green
“The Duct Tape Method” DIY change tires motorcycle yourself without tools! How to
I double taped about 2-3 inches or so on about 16″ strips. So lay out long strip and cut a short piece and tape over it so the two sticky parts lay face together stuck together. Why? That’s the part you line up with the tire inner bead part. This way you can pull it out easily and fast after tire put on.
CLICK pic below to see my video here:
I taped the sticky long half under tire pressed two walls together – which is SUPER easy with the Q3. Mine was soft as butter after spending about 6 hours inside a normal temp apt. Did it with a finger and a thumb it’s so compliant.
Space those tape points roughly out the same. Then I used just a little dish soap and water mix around the tire and wheel half where I’d have to push.

I got it about 65% on and it started getting very tight. This is where I said in my head “there is no f-ing way this is gonna happen” But I made sure the already mounted portion was snug squarely in the center of the wheel and therefore its smallest radius. In fact I kind of man handled it pretty good and stuffed it and made sure it was snug in there. That made a big difference – even though it looked the same before, it wasnt. Smoosh that tire up in there inside that middle part of the rim!
Then I pushed on both sides of last 35% of tire and in about 30 seconds it just plop! Slid right over the wheel rim!
I was shocked that worked. Aired up a gas station to about 70 psi and got 95% of bead perfect in. 2nd to last bead I had to bounce a lot and more air to 70 and it POPPED in loud. Didn’t want to go higher air pressure and bounced it a lot, finally tossed in my car trunk with one last part not fully seated – although holding air just fine for now. About 25 minutes later it had seated itself perfectly. Aired down to 40 lbs and voila! New tire!
(The old tire I chopped up a lot before breaking the bead – not good. Not recommended, break bead fully first! Although by slicing through one entire sidewall and having 2 separate parts I was able to dismount the tire with my bare hands and not much force. This is coming from the guy who can hardly center stand this bike so I’m not the most ripped person on earth I’ll tell you that! Think computer user body build). No irons no spoons NO rim damage!
Finally broke both beads on the front tire. Was at it 1-2 hrs. So before I forget, I’ll post tips.
I borrowed two craftsman bar clamps with the squeezy grips. Another C clamp style one was worthless. These two is what I needed. The 8″ wooden angle changing one that Pengaru has in the tire change DIY sticky would be a lot better.
Set both clamps about 4-6″ apart on wheel. I tried and tried and tried. Was about to give up. And I recalled how I chopped through rear tire. 
So I sawed horizontal cut through front tire, and was able to push in tire. And I coated inside it up a lot with water and soap and that’s what finally enabled me to break it free, lubing inside bead and tire area. If you have trouble with clamps do that and it will help a lot.
I didn’t have an easy ability to make the wooden 2×4′ eight foot lever using a car thing, next time I’d prefer to try that or get the wooden clamp. This method was a lot of grief.
(I couldn’t push this one off like the rear, wasn’t even close to going. Tried clamping sidewalls together and that’s closer but not close enough.)
Wow, getting old tire off and new on was easy! Not really harder than rear wheel.
I used DUCT TAPE again to get old tire off and new one on. No extra cutting.
Now just need to air up

Edit: I put the f ing tire on the wrong direction this time. I was so pissed.
I just had to completely redo it BUT it did go smooth once re duct taped it again AND I shot a video of it this time. Should not have forgotten to check direction. But at least its on and right direction.
I’ve just slipped both sides together off the rim with duct tape. A milk crate underneath works great for protection.
(I did remove the right rotor but don’t real need to if you’re careful. Next change I won’t bother).
This is how I duct taped the tire beads together to slide it off the rim (didn’t take a ‘before’ pic).
I did actually use a small zip tie to fish the first piece of duct tape between rim and tire. After first tape piece is in its much easier with more space to work. Notice hacksaw cut for applying inner lubricant for breaking the bead step earlier.

The brand new tire all taped up and ready to try installing. This was my first attempt on a front wheel ever and it went on a lot easier than I thought. I recommend duct tape because its a wider band and will potentially cut less into new tire than a zip tie, not scratch rims like a lever could and most people actually have duct tape on hand!

I made my own little wheel balance station like this below. I leveled (with a level) side to side and front to back two milk crates on a small table and then used the actual axle to mount the wheel and spin the wheel. It’s more like you try to find the heavy spot, and raise it from the bottom up 90 degrees to a 9 or 3 O’clock type position (horizontal heavy part on wheel down), and let it fall. Keep adding weight until is does not spin down at all. I used very strong magnets for this to the rim, adding 1 at a time.

I wound up being 1.3 oz out of balance on the rear wheel, and fine on the front wheel and made no adjustments there. About a month and, um 1200 miles later, finally got peel and stick wheel weights and installed 1.3 oz on rear wheel where I had marked it with tape.
Posted in DIY, repair and tagged change tires, duct tape method, no tools, Zx6e, zzr600 by green
Just changed front and rear tires myself!! 46,439 miles.
 I just changed the front and rear tires on stock whees to a Dunlop SportMax Q3. Stock size 160/60/ZR17 and 120/60/ZR17.
Those tires, at least, are very compliant. I can join two beads together with duct tape with a finger and thumb. Another nod to their great “handling”
The bead braking part was the hardest part, used 2 clamps. After that change in and out was easy and fast. Very surprising. This is my first tire change ever.
Details coming. Essentially it’s a modified “zip tie” trick. Only I didn’t have zip ties just duct tape laying around.
Did rear first and for front wheel I’d read it’s harder. It turned out to be about the same.
I was pretty excited about it and stunned it worked so I wanted to share. (This is been on my ‘mechanical’ bucket list for years and years and I always wussed out).
The actual mounting of new tire was easy and only took 2 minutes!
Posted in Uncategorized by green
Just purchased Sidi Strada waterproof boots – used $40! + Technic leather pants

Looks barely worn Sidi Strada black waterproof boots. Apparently they are made of “Lorica” a duPont manufactured synthetic leather that Sidi uses in most of its bicycling shoes and moto boots. The are incredibly comfortable and light.
Completely opposite from the MX motor cross AlpineStar boots I bought last week. I quickly resold them a few days later for a $10 profit. I wanted them to work, but they were thick, heavy as hell, thick, and I couldn’t shift in them or at least no feel, had to reposition shifter to drive bike with them, and then could not feel up shifting whatsoever. Not good on a 46K bike.
I also scored a pair of Teknic black leather pants, I’ve never owned a pair of leather pants in all these years of riding. I also go one for $40 and they have pucks / knee sliders that I’d hope to get down sometime this year – drop my knee in a turn.

Ordered a New set of Dunlop Q3 racey hyper sport tires. They arrive tomorrow! And I plan to install them myself! Which will be a first and probably pretty tough. Gonna use the “zip tie method” but have hacksaw, tin snips, drill and box cutters on stand by to aid the removal of old tires in case… That seems to be the worst part of job.
Posted in Uncategorized by green
DIY rear rack for ZX6e Ninja bike V2 completed!
Version 2 just finished today!
I used 1/2″ steel EMT tube. A 10′ piece costs about $2.50 at Home Despot. (in electrical aisle). It’s that metal conduit for garage / basement / outdoor wire running. It has some sort of coating on it too to make it ‘waterproof’ and not rust – although the cut and drill points remain to be seen how they hold up.
This is a pretty cool solution if you’re like me, and like cheap.
It’s stronger and better looking than V1. (steel vs aluminum)

I also only drilled through the lower part of EMT at the front mounts by the seat for this version. Cleaner and stronger. I used spare battery bolts and nuts up there – c’mon you been riding more than 2 years you know you have extras of those kicking around!


This version looks a LOT nicer. The crossbars in the back I integrated more into the design. Cleaner, lower profile for bags on top, and less nuts to shake around and loosen up riding.
This bike already does a good enough job shaking my own nuts around. ![]()
I drilled into the inside portions only this time for the ‘crossbars’ at the rear. It was donor metal I scrounged from a metal rack I found abandoned on the street (that’s how we roll in the city here, or really how people and hipsters etc… do when they move here and move on). I measured and cut them to size with a hacksaw.
Oh and I should have mentioned it, I more or less followed the crutch double bends. I bent it a little more custom to raise it a little higher and dip the angle back lower a little.
But what I did with the EMT is bend the back two bends first with an EMT pipe bender. I have a tiny kink on the inside edge of one, but it’s not a big deal.
Here’s some updated measurements I made in 2015 of the same rack:


Posted in DIY by green
California touring. Coast mtns turns 200 mi

Drove 202 miles and hit 101 on the 1 for those who like numbers.
That’s the longest I’ve driven my E in a day, and the fastest I’ve gone. Weather about 60. Mostly sunny. Great coastal weather with the frequent fog and gloom out there by the sea otherwise.
Biked to work 3x this week and Friday we got done at noon! So I headed for the coast since I was already 35 miles away in the peninsula.
Took 92 all the way to Half Moon Bay and went slightly up the 1 to a little surf spot by Mavericks and ate whatever food I brought in my tank bag.
Back on the 1 south – I passed a full police escort making traffic a mess escorting a bicyclist riding Amaerica for a charity. But that’s cool, good cause.
Took a left off 1 to Creek cutoff road and followed to Tunitas Creek road. Very cute single lane road winding over small pass and farmland. Will a bunch of recent rain CA up here is very green and pretty now.
Took Tunitas back to the 1 just cause, and looped back on Tunitas the whole way to Skyline. Tunitas Creek road is a tiny windy redwood grooved mysterious road. Empty of cars. Met a nice Canadian biker girl (bicyclist) riding for 2 weeks in America and camping at night.
Skyline south to Alice’s / 4 corners / Woodside and then at least the locally famous and acclaimed superstar road 84 east to the sea. What a road! Haven’t driven it n years and first time in my life on a bike. Wow! Turns after turns and more turns. They never seem to end. Perfect pavement great turns makes you feel heroic out there! Rt 1 to Stinson beach or 84 as favorite? Hmmmm… Lets pass that question for now, they are both my favorites!
I then turned again onto Rt 1 south with Pigeon Pt lighthouse as my destination goal. Made quite a few beach and photo stops along the way.
Really pretty and rugged coastline. Impressive empty surf. At Pigeon Pt I walked to end and saw grey whales spouting and their backs coming out of the water while stopped there which was cool.
I guess they are migrating back north after escaping the winter chilly north waters for southern birthing.
Back on 1 north towards 84 I wound out bike to 11K, man that motor pulls over 7k, it just screams at 9k +
Hit indicated 101 mph but the front was a little unstable. Perhaps I also have a little head shake after 95 mph but I never notice it otherwise. At about 95 mph the front end becomes somewhat unstable. Literally the front end, as in the main fairings start vibrating and flapping about. I’m missing several mount tabs (broken off) from the main nose fairings where it bolts in below, and one small fairing piece apparently I’m missing under the headlight. So my horn flaps about like crazy after 50-60 mph too.
Zipped up and down 84 to 4 corners (84 & Skyline) again, the roads are just too good to do once or twice. And back to the O town.
Really looking forward to putting 1″ bar risers on the bike I think it would be a huge improvement over stock for me, but this bike is sweet!
First tank of gas: 47.5 mpg. 2nd tank 42 mpg.

This is Skyline.

Skyline north of Woodside. Redwoods.


Posted in Touring and tagged Carmel, Gold Coast, Highway 1, Monterrey by green
Moto riding to work all week.
Riding to work all week. Had nice unexpected weather break today. Morning partly sunny.
Parked Green Magic in parking garage and it poured midday. Should be clear for ride home.
Will make at least one run to the ocean after work or Marin or something.
Got back to Green Magic last night after working in MA and cape construction.
Posted in Uncategorized by green
Just fabricated DIY rear luggage rack from a crutch!

 Had this zany idea to try to make a rear rack for my kawasaki zx6e out of crutch parts before, after seeing several in swap shops on the east coast…
So what do I walk by the other day? A discarded free aluminum crutch on the curb.
Started it a few days ago, and then got inspired to change my design tonight and use angle brackets to get the long side tubes closer to the bike and fairings to reduce torque stress.
Planning to add a third rail on the rear very soon. If I had made precise cuts of the crutch beforehand I would have had enough lengths for 3 crossbars but I was cutting conservatively, making several cuts and refining lengths as I was not sure how long the final version should be. Pretty fun project. It bolts into stock bungee mount holes using the stock bungee bolts – that came about as an intentional change for the original design idea with spacers.


Raising the mount points higher up makes the clearance on the fairing more confidence inspiring. If you simply go straight out with a really long custom M6 1.0 pitch bolt
a ) they are hard to find that long
b ) there is a lot of extra torque farther out on the bolts and the subframe mounts
c ) most worrisome is the long bars are a lot lower, almost sitting on the fairing, and I just thought of this setup under load and with bumps and flexing how the fairings could easily get damaged and scratched.


Front mount. You really want to max height to better meet the naturally higher rear mount points in the subframe but not mash into the fairing. I popped the crutch plastic plugs back in for a little less sharp forward edges.


Posted in Uncategorized by green
Yo! We got that B Roll!, Or how to get paid $800 to ride your E
It was the best of times it was (almost) the worst of times…. Read on reader.
As the title suggests I did in fact get paid handsomely to ride my E 100 miles yesterday in lovely 62 weather. Weather so warm and with my activities I was sweating most of the day after taking the liner out of jacket, and down to T shirt, nylon synth Long sleeve and Frank Thomas unlined jacket. So amazing right? Couldn’t be better?
Does playing chicken with a BMW in his lane sound like a good idea?
So what is this B Roll you ask? If you don’t know that phrase allow me to introduce you to this guy:
(I did not shoot this video in the link, I just love the video).
Link:
http://m.youtube.com/watch?v=SItFvB0Upb8

——————–
G.M. Riding again!
So for start of trip I had to watch weather closely for a week to plan trip into SF. It had to be sunny or mostly sunny to match footage we shot earlier for a TV episode. I took my chance yesterday with first 50/50 cloud sun mix predicted in over a week.
I also had to stuff a camera that costs 7X what i paid for Green Magic in a used set of TourMaster saddlebags that I had never figured out to mount right. And a bunch of other crap like extra batteries, charger, new gopro that refused to work later for fun ride, water, layers etc in other bag and full tripod. Ad my phone toasted itself a week ago so no phone. I’m used to riding always with one now just in case.
I zipped out of Oakland in fog and clouds over super foggy bridge and into sunshine and the Golden Gate park!
Then on to Ocean Beach to get, you guessed it, B Roll shots of beach and views up by the Cliff House.

A closer shot of bags set up. Apparently I mount them backwards, but they fit better that way. If I try to mount under seat they will almost certainly hit the pipes. And melt?? So I put em backwards and slide them forward to rest on the passenger footpegs. I have camera squashed into this bag.

So the good:
Beautiful weather – escaping east coast winter
Paid riding time, bike working
Pretty areas.
Shooting solo, self directed, no silly know nothing producer with me telling me what to do. (Which can happen from time to time on shoots).
Route 1 afterwards for fun to Stinson beach, currently my favorite twisties anywhere. They are sick.
Got all the shots requested and they came out great.
Not so great:
Stressful with that much valuable gear with me in new untested gear. Hwy speeds, heavy cornering etc
Had to constantly get off bike, pull cam and strapped tripod set up shoot and put it all back together and repeat over and over. Not really a joyride. Shooting often with helmet on so didn’t have to pop off seat and jam helmet behind bag to lock it. I’m sure I looked sensible on the beach wearing a helmet getting B Roll of surfing.
$300 goes to camera and gear.
The worst fog I ever hit riding Golden Gate Bridge at rush hour. You could see nothing. Water and fogged up glasses and shield. Nearly riding blind in stop and go traffic over bridge.
Rush hour Bay Area return. It’s f ing awful. At least it’s legal to split lanes if not stressful.
Slow time of year. Only booked 2 days in last 3 weeks.
And about chicken…
I did route 1 to the Pelican Inn and back 2 full loops. Returning to go home after cranking turns I hit a corner going at quick but not fast fast pace. Said corner had water and dirt all over it. I immediately locked up both wheels and went into skid. I quickly got off both both brakes, stood the bike up straight, crossed the double line completely into oncoming lane for maybe 150 feet. While I had right foot down to hold bike up and try to fully recover before I dared ease the bike back into my lane. I could see a car had been approaching and was about to come around huge corner.
The BMW had to slow down after his blind corner and seeing me completely in his lane. Needless to say he look surprised. I more or less had to force him to brake (fortunately he was going slow anyway) and out of his lane or both. Thanks guy, a cager who wasn’t a dick.
It was a pretty scary event. If I had kept on brakes or tried to force bike into my lane I definitely would have downed bike and either slid into car or off the road and crossed in front of him into hill banking. I do know I really shouldn’t have been on brakes at all into a turn. Kind of lazy probably stupid end of long day not 100% focused riding in slower easier turn area. Dumb.
Below: Pic of turns and fog bank that chased me out of Stinson and back up the ridge on route 1. The whole fog bank kept me out of final approach into Stinson beach with horrible visibility and followed me back up the mtn ridge off the turns a little earlier than I wanted.

Posted in Uncategorized by green