Debaffle stock exhaust Kawasaki Ninja ZX6e. Exhaust Mod. How to. DIY
This is a modification to the stock dual can muffler exhaust on the Ninja ZX6E 1993 – 2004 also known as the ZZR00 in 2004 and in Europe.
This was all inspired by “mechanicalmadness” member of the old zx6e.com forum. He did this exhaust mod and made a great write up although it’s gone from the internet now.
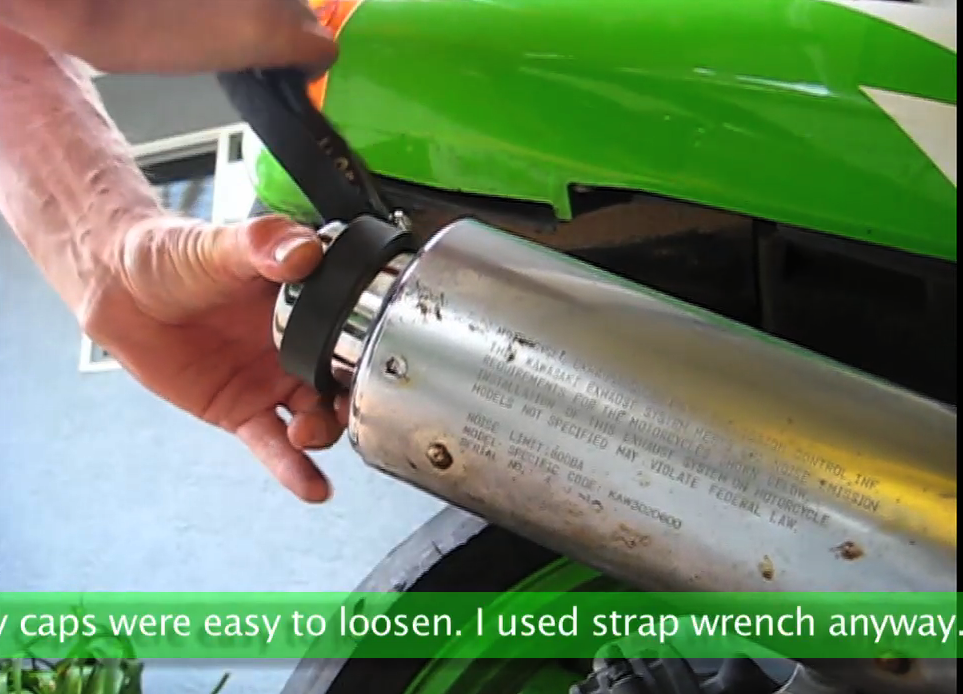
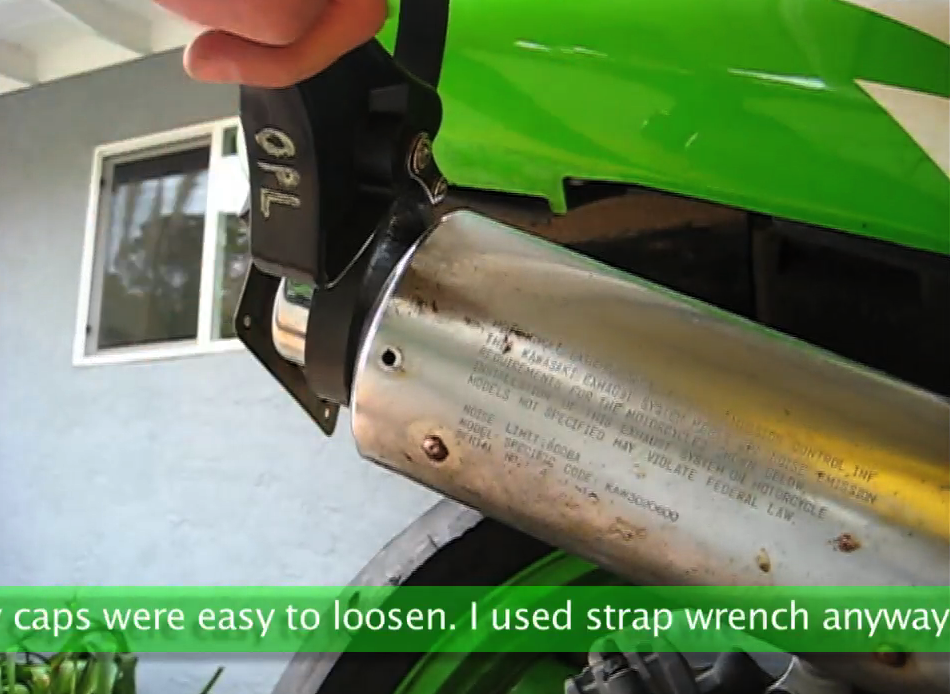
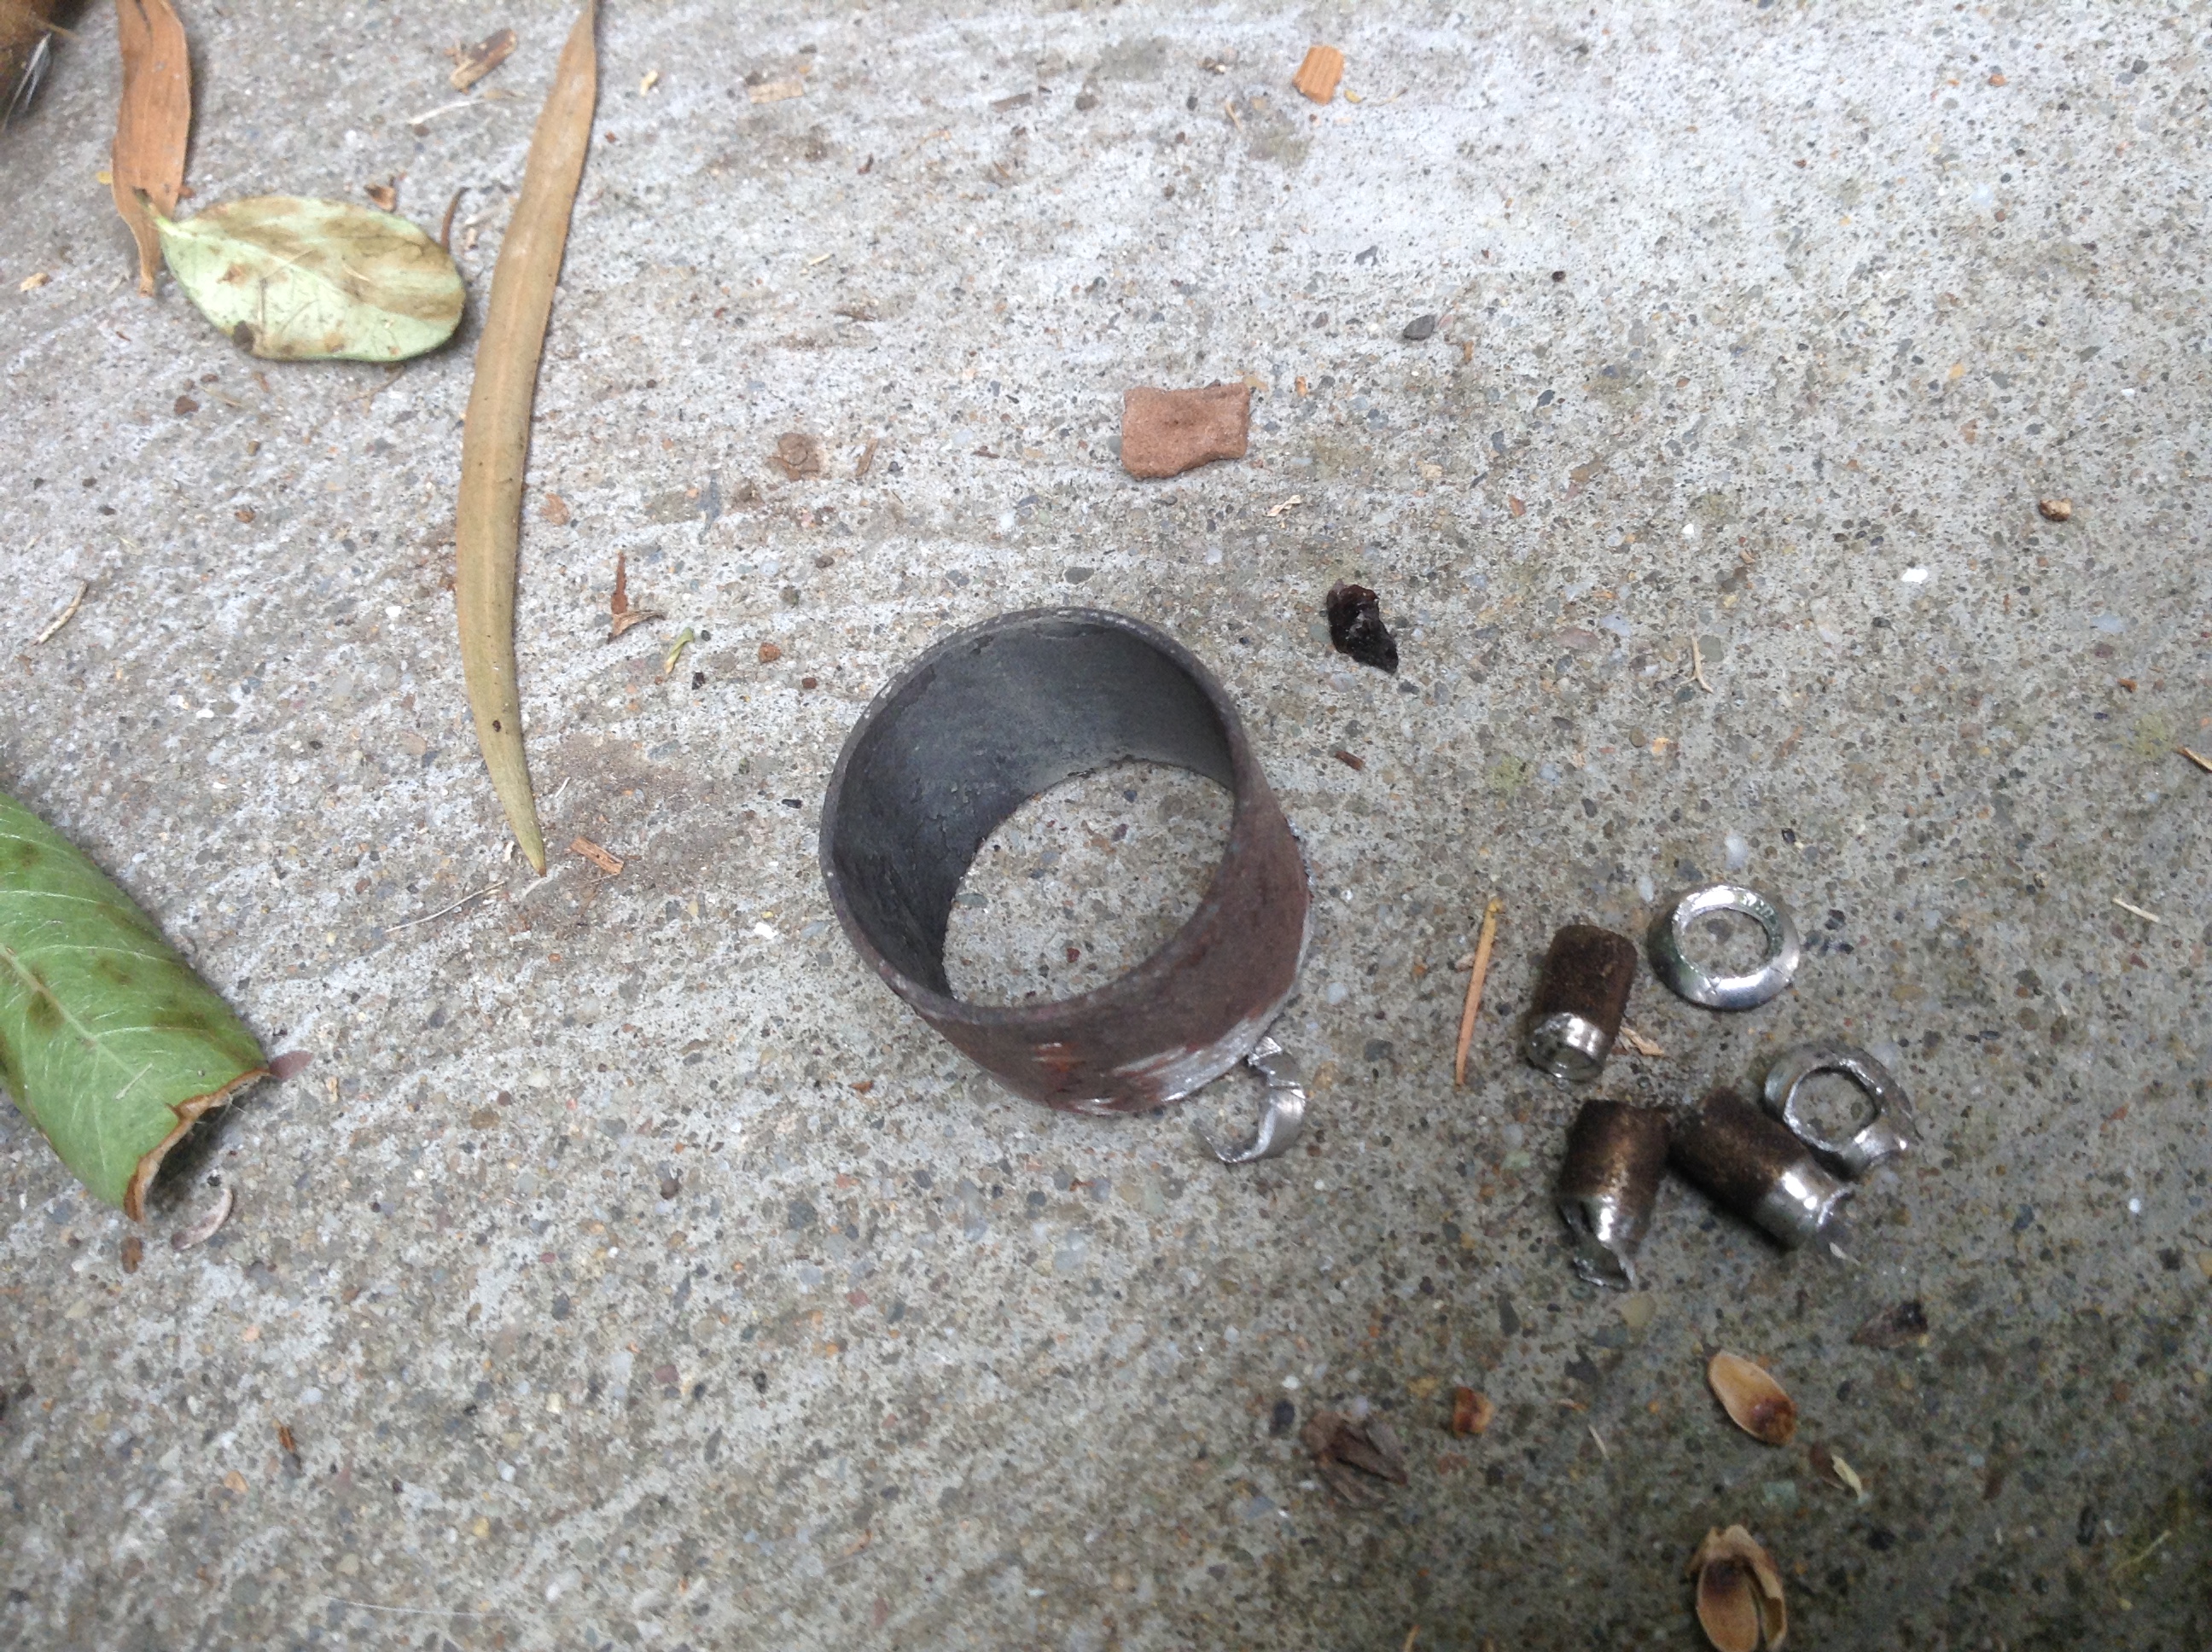
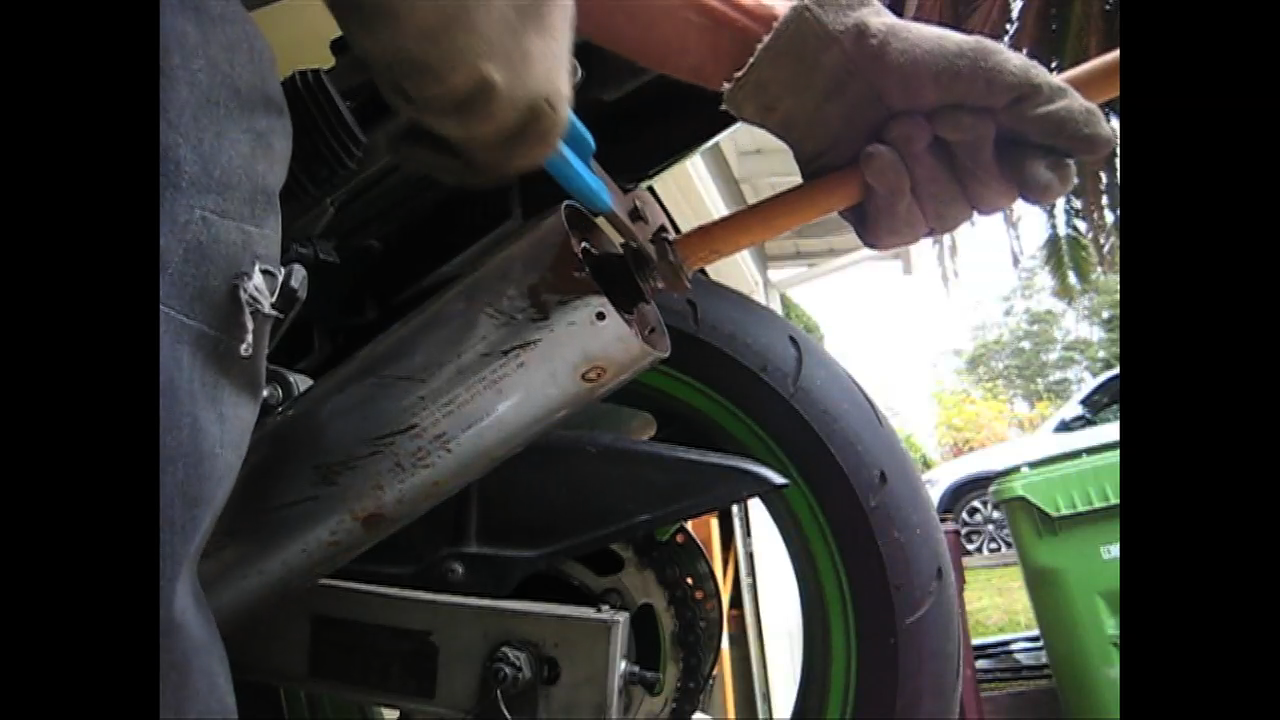
First thing, you have to drill out the exhaust cap rivets, there are three per side.
Next, you need to spin the exhaust caps out. I used a strap wrench. There is some sealant in there that does not let the cap release easily. Mine were easy to loosen though, perhaps due to their age.
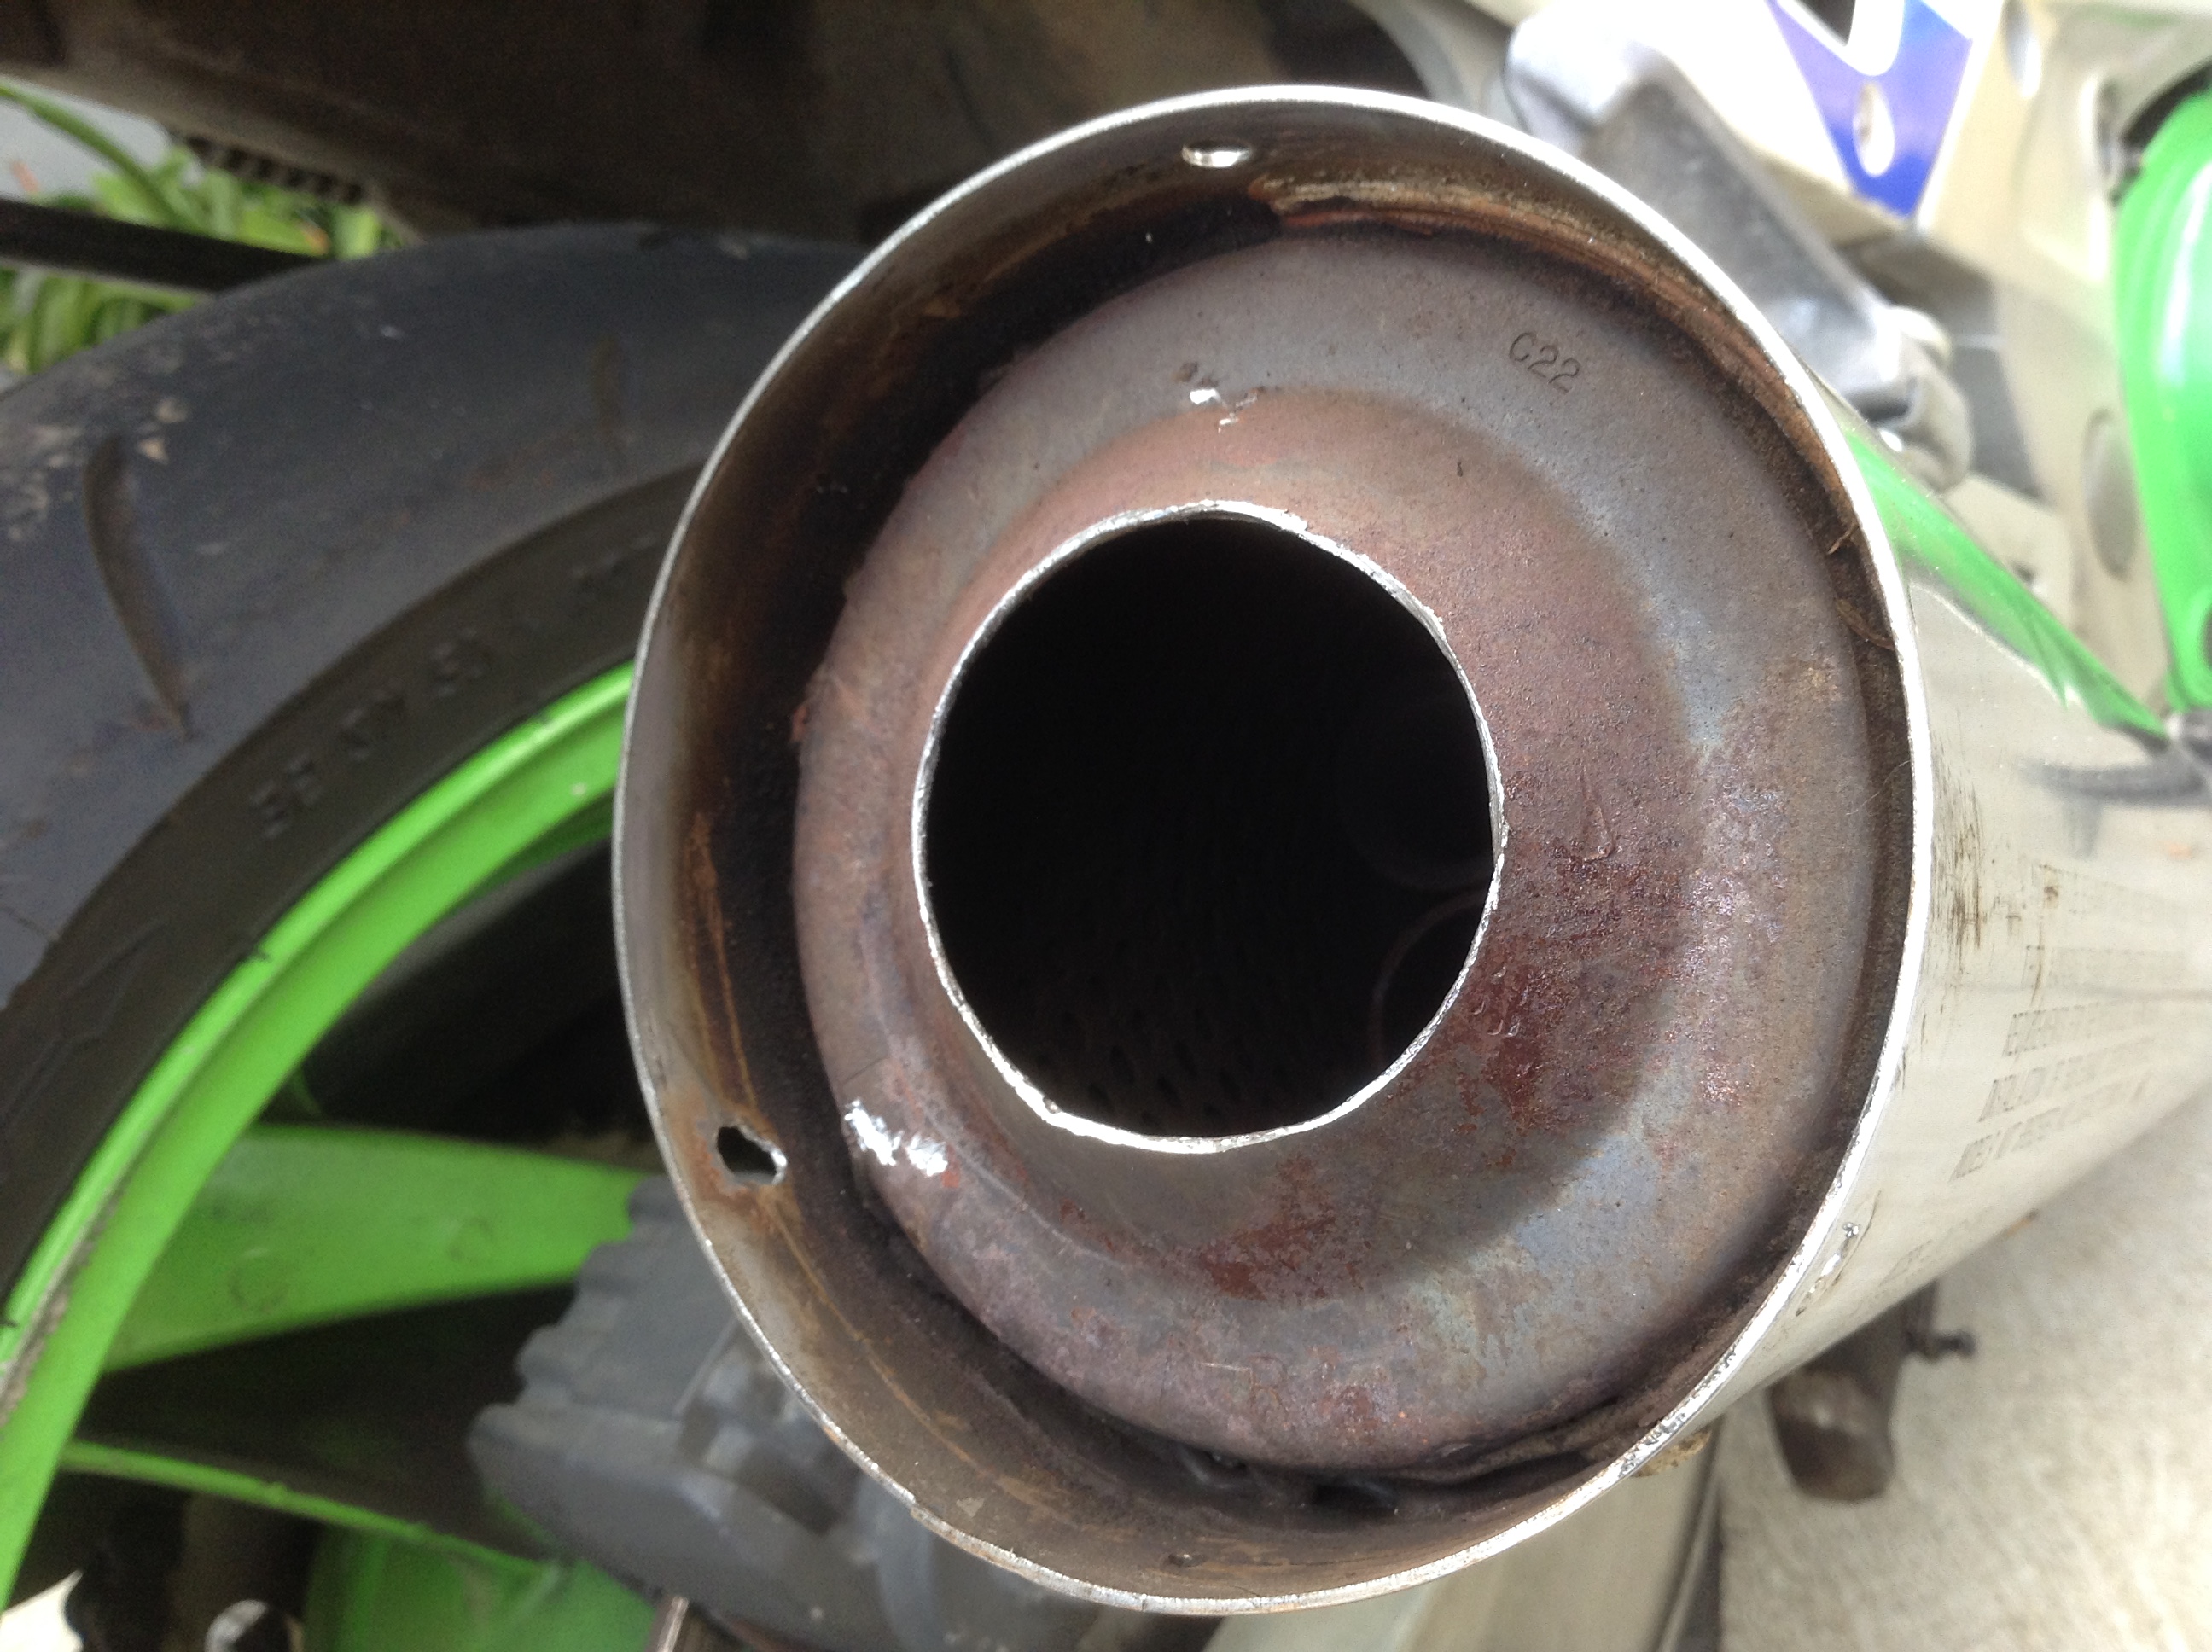
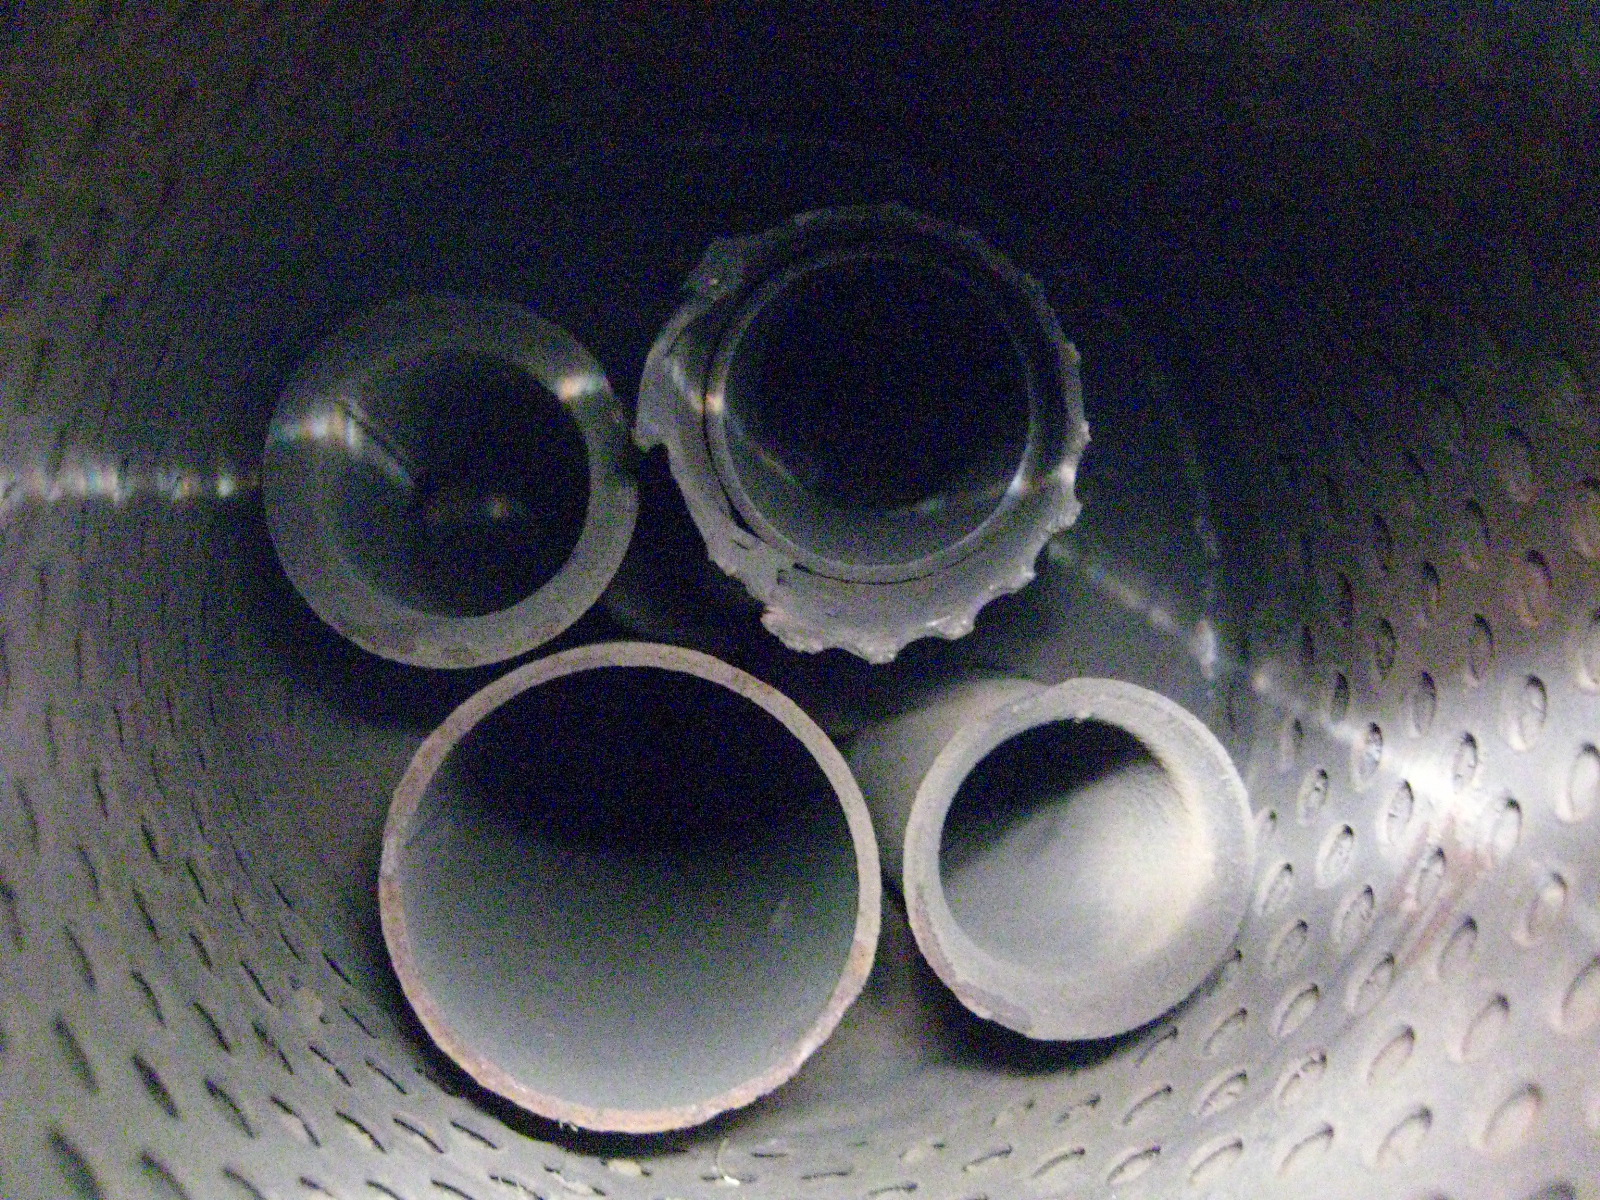
Removing the end caps reveals this:
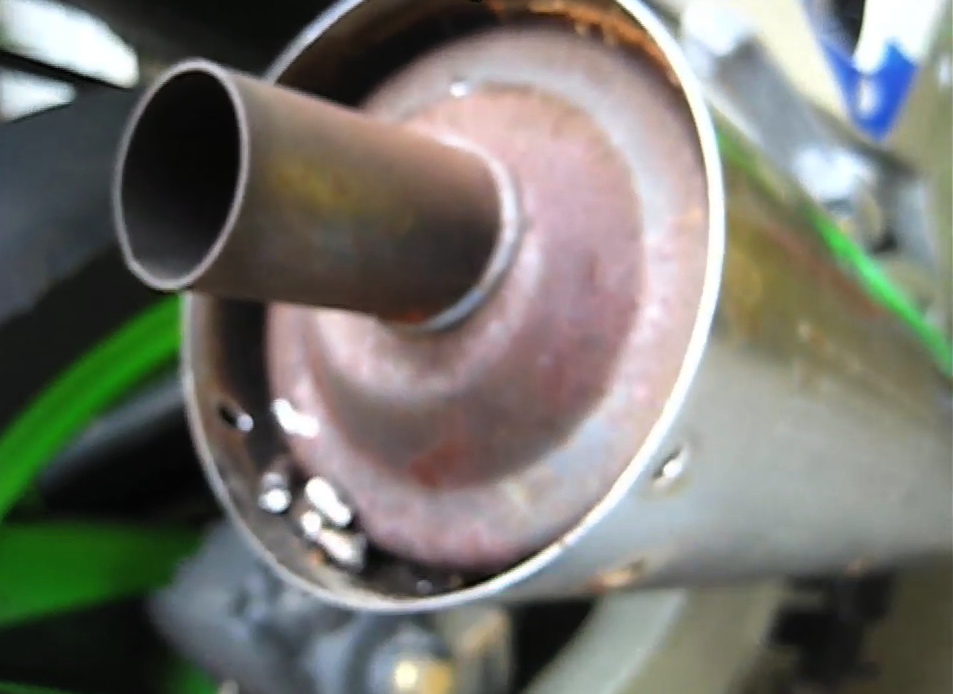
This is the final tail pipe that comes from 1 of 4 pipes inside as you are about to see.
Then, I used a 1 + 3/4″ (44mm) hole saw for metal to make it fairly easy.

To get the holesaw to bite into the base of the end of the exhaust I cut the tail pipe off with a hacksaw first – maybe 1.5″ off or so.
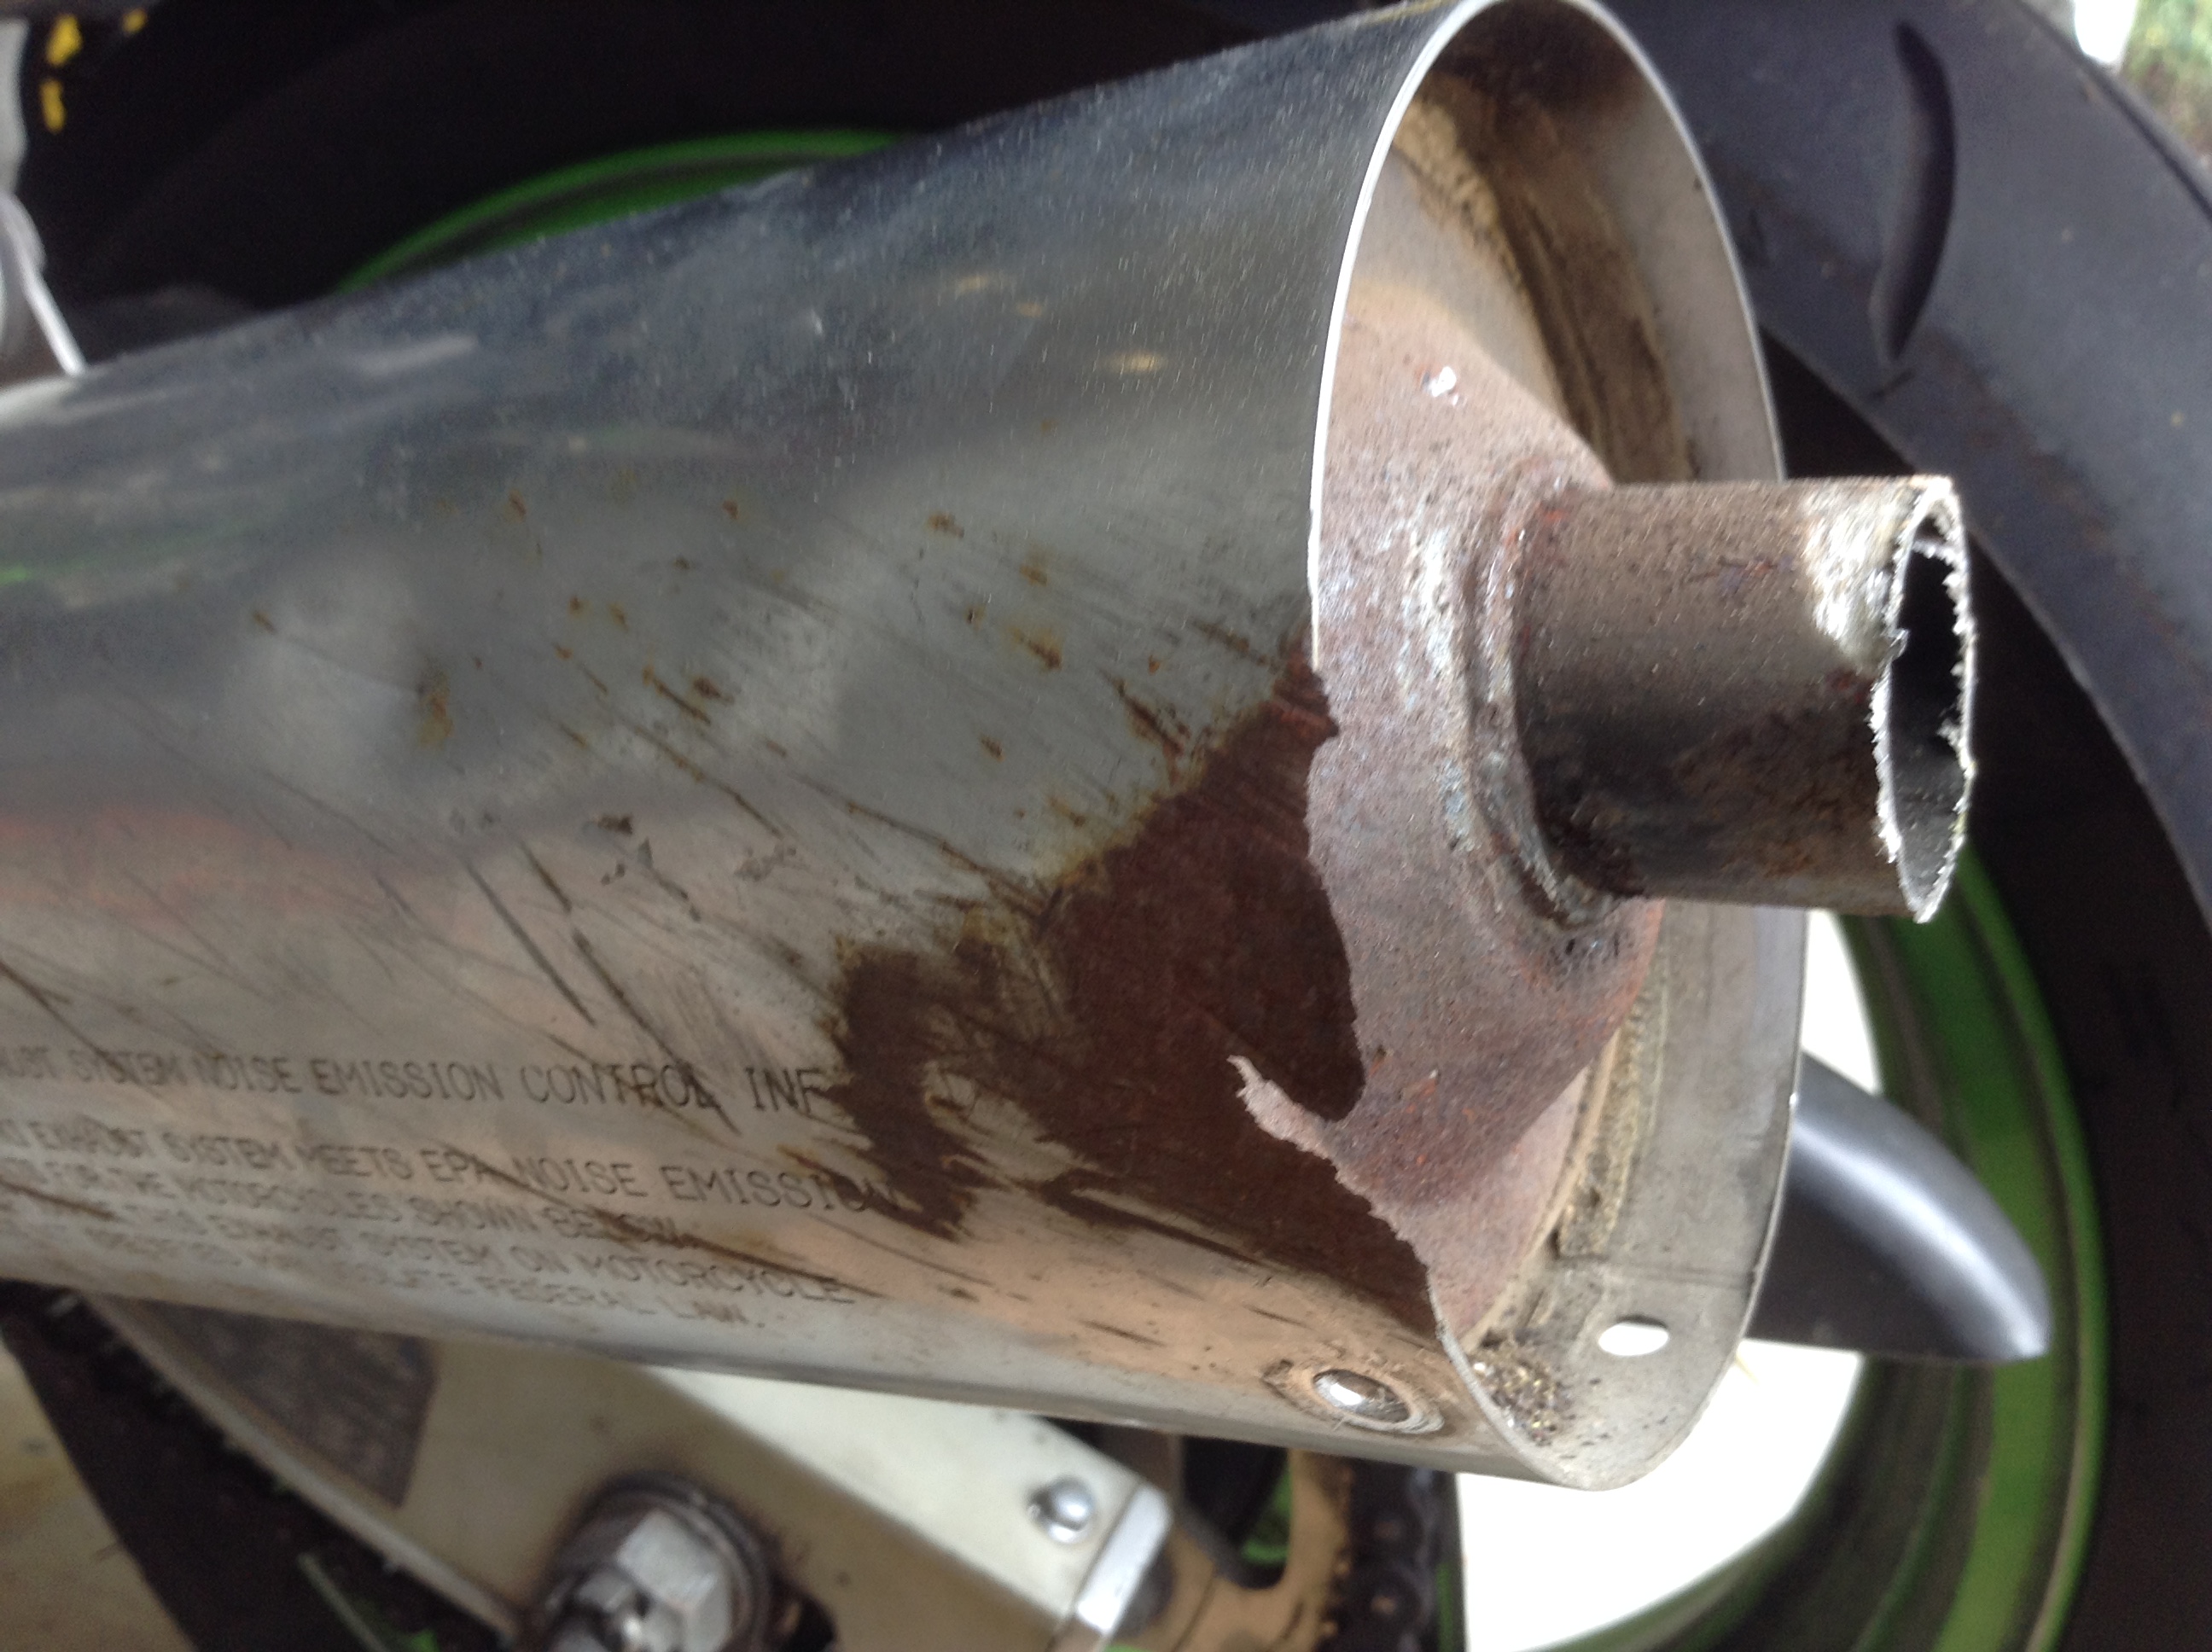

Then the hole saw will easily reach the metal to cut.
Once that’s done, you now need to break the inside weld spots on this tailpipe / baffle. I jammed a wooden dowel in there, and used lockjaw pliers to put a lot of force on it, mostly rotating. You might find this step easier with a larger hole saw hole, but I didn’t want to go too big here.
It took some time but eventually you fatigue the metal and snap it off and out of there.
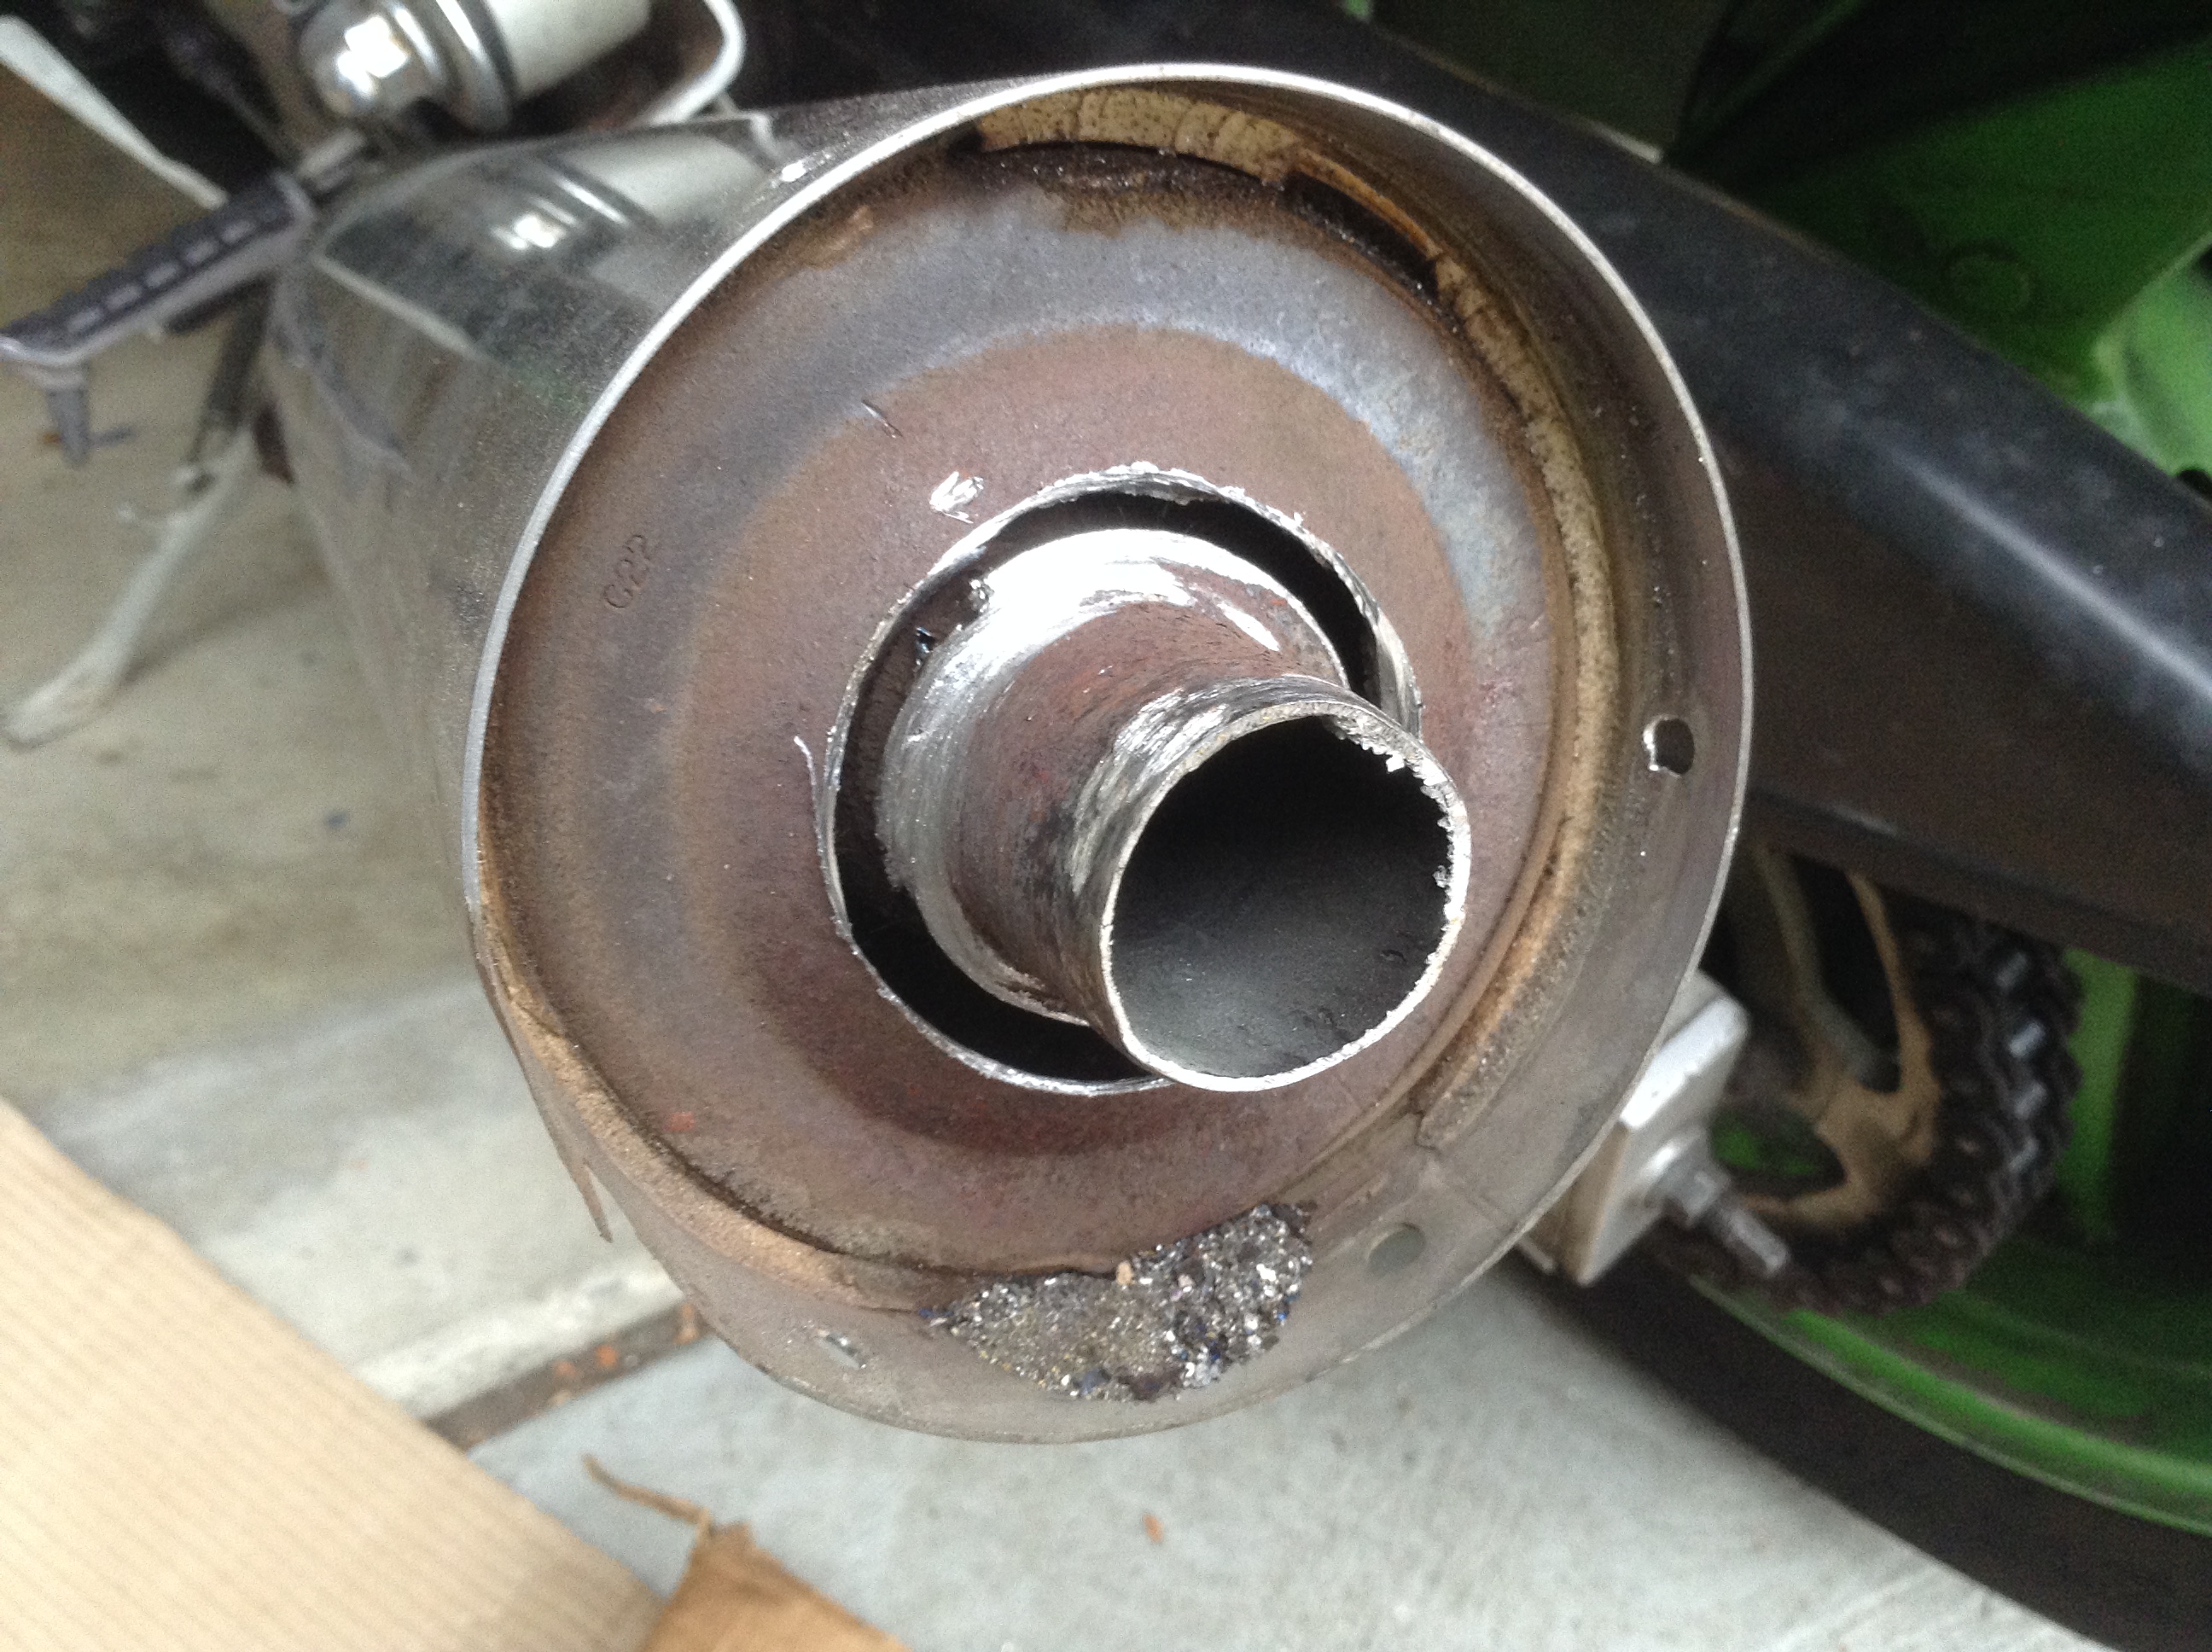
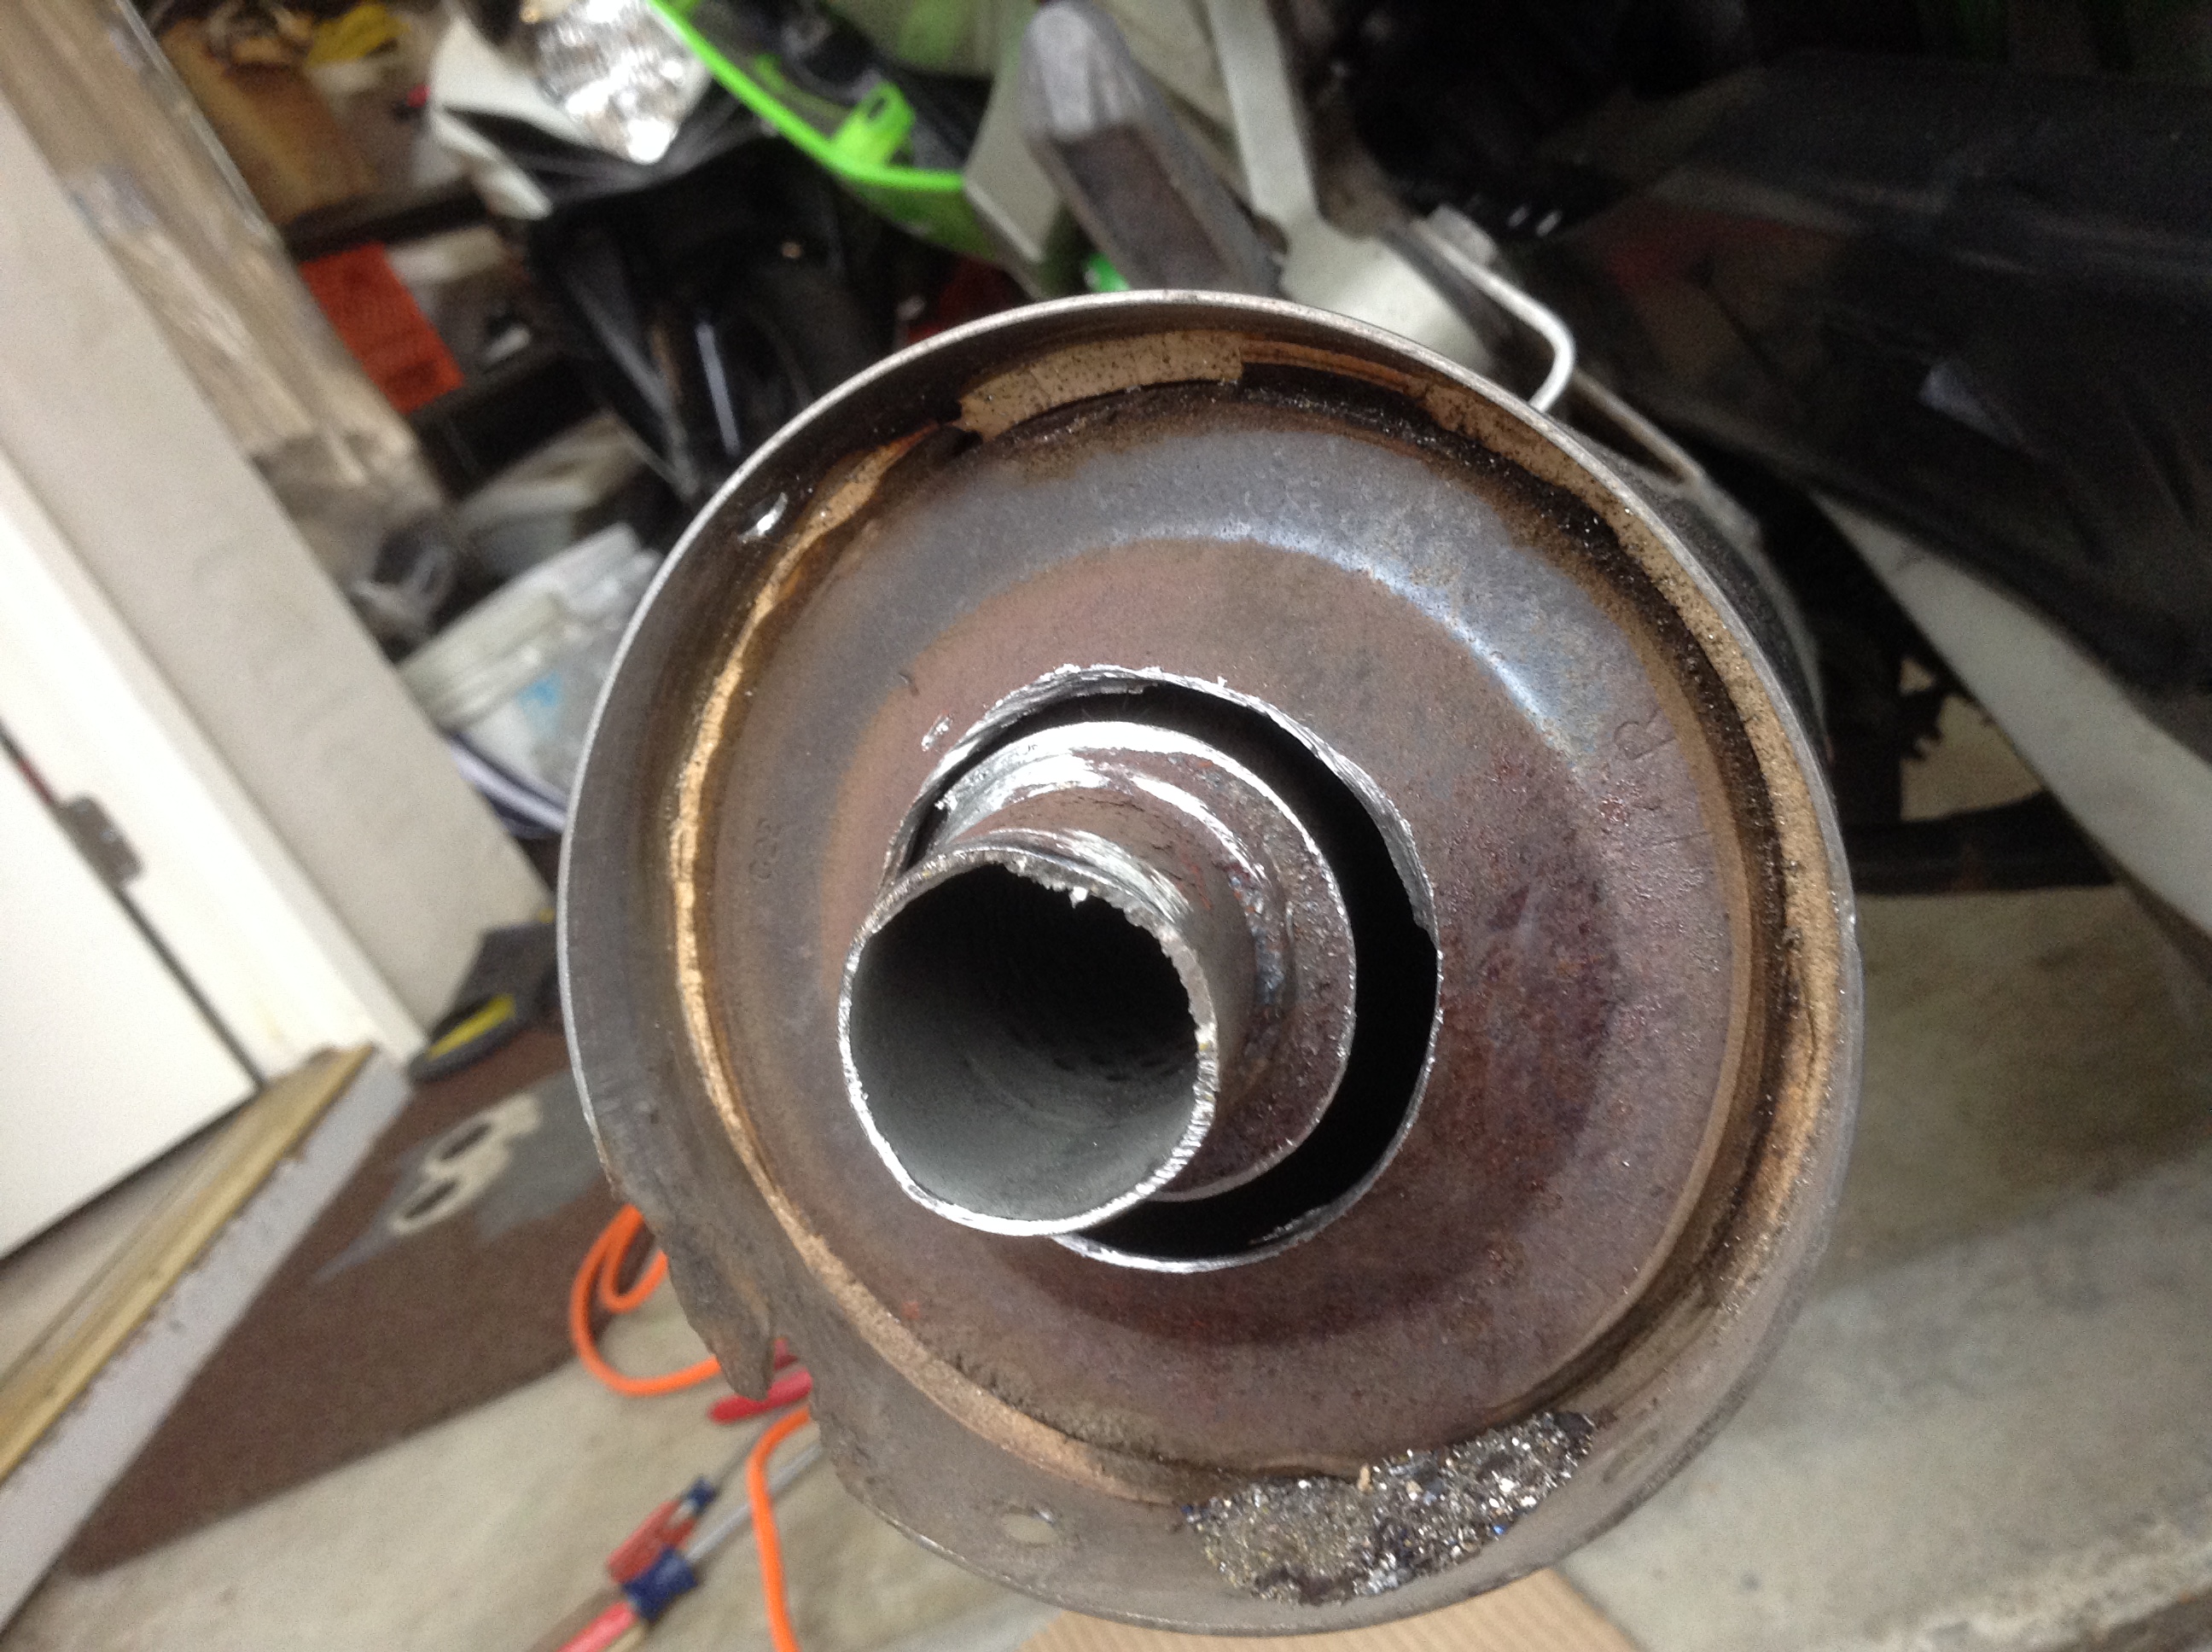
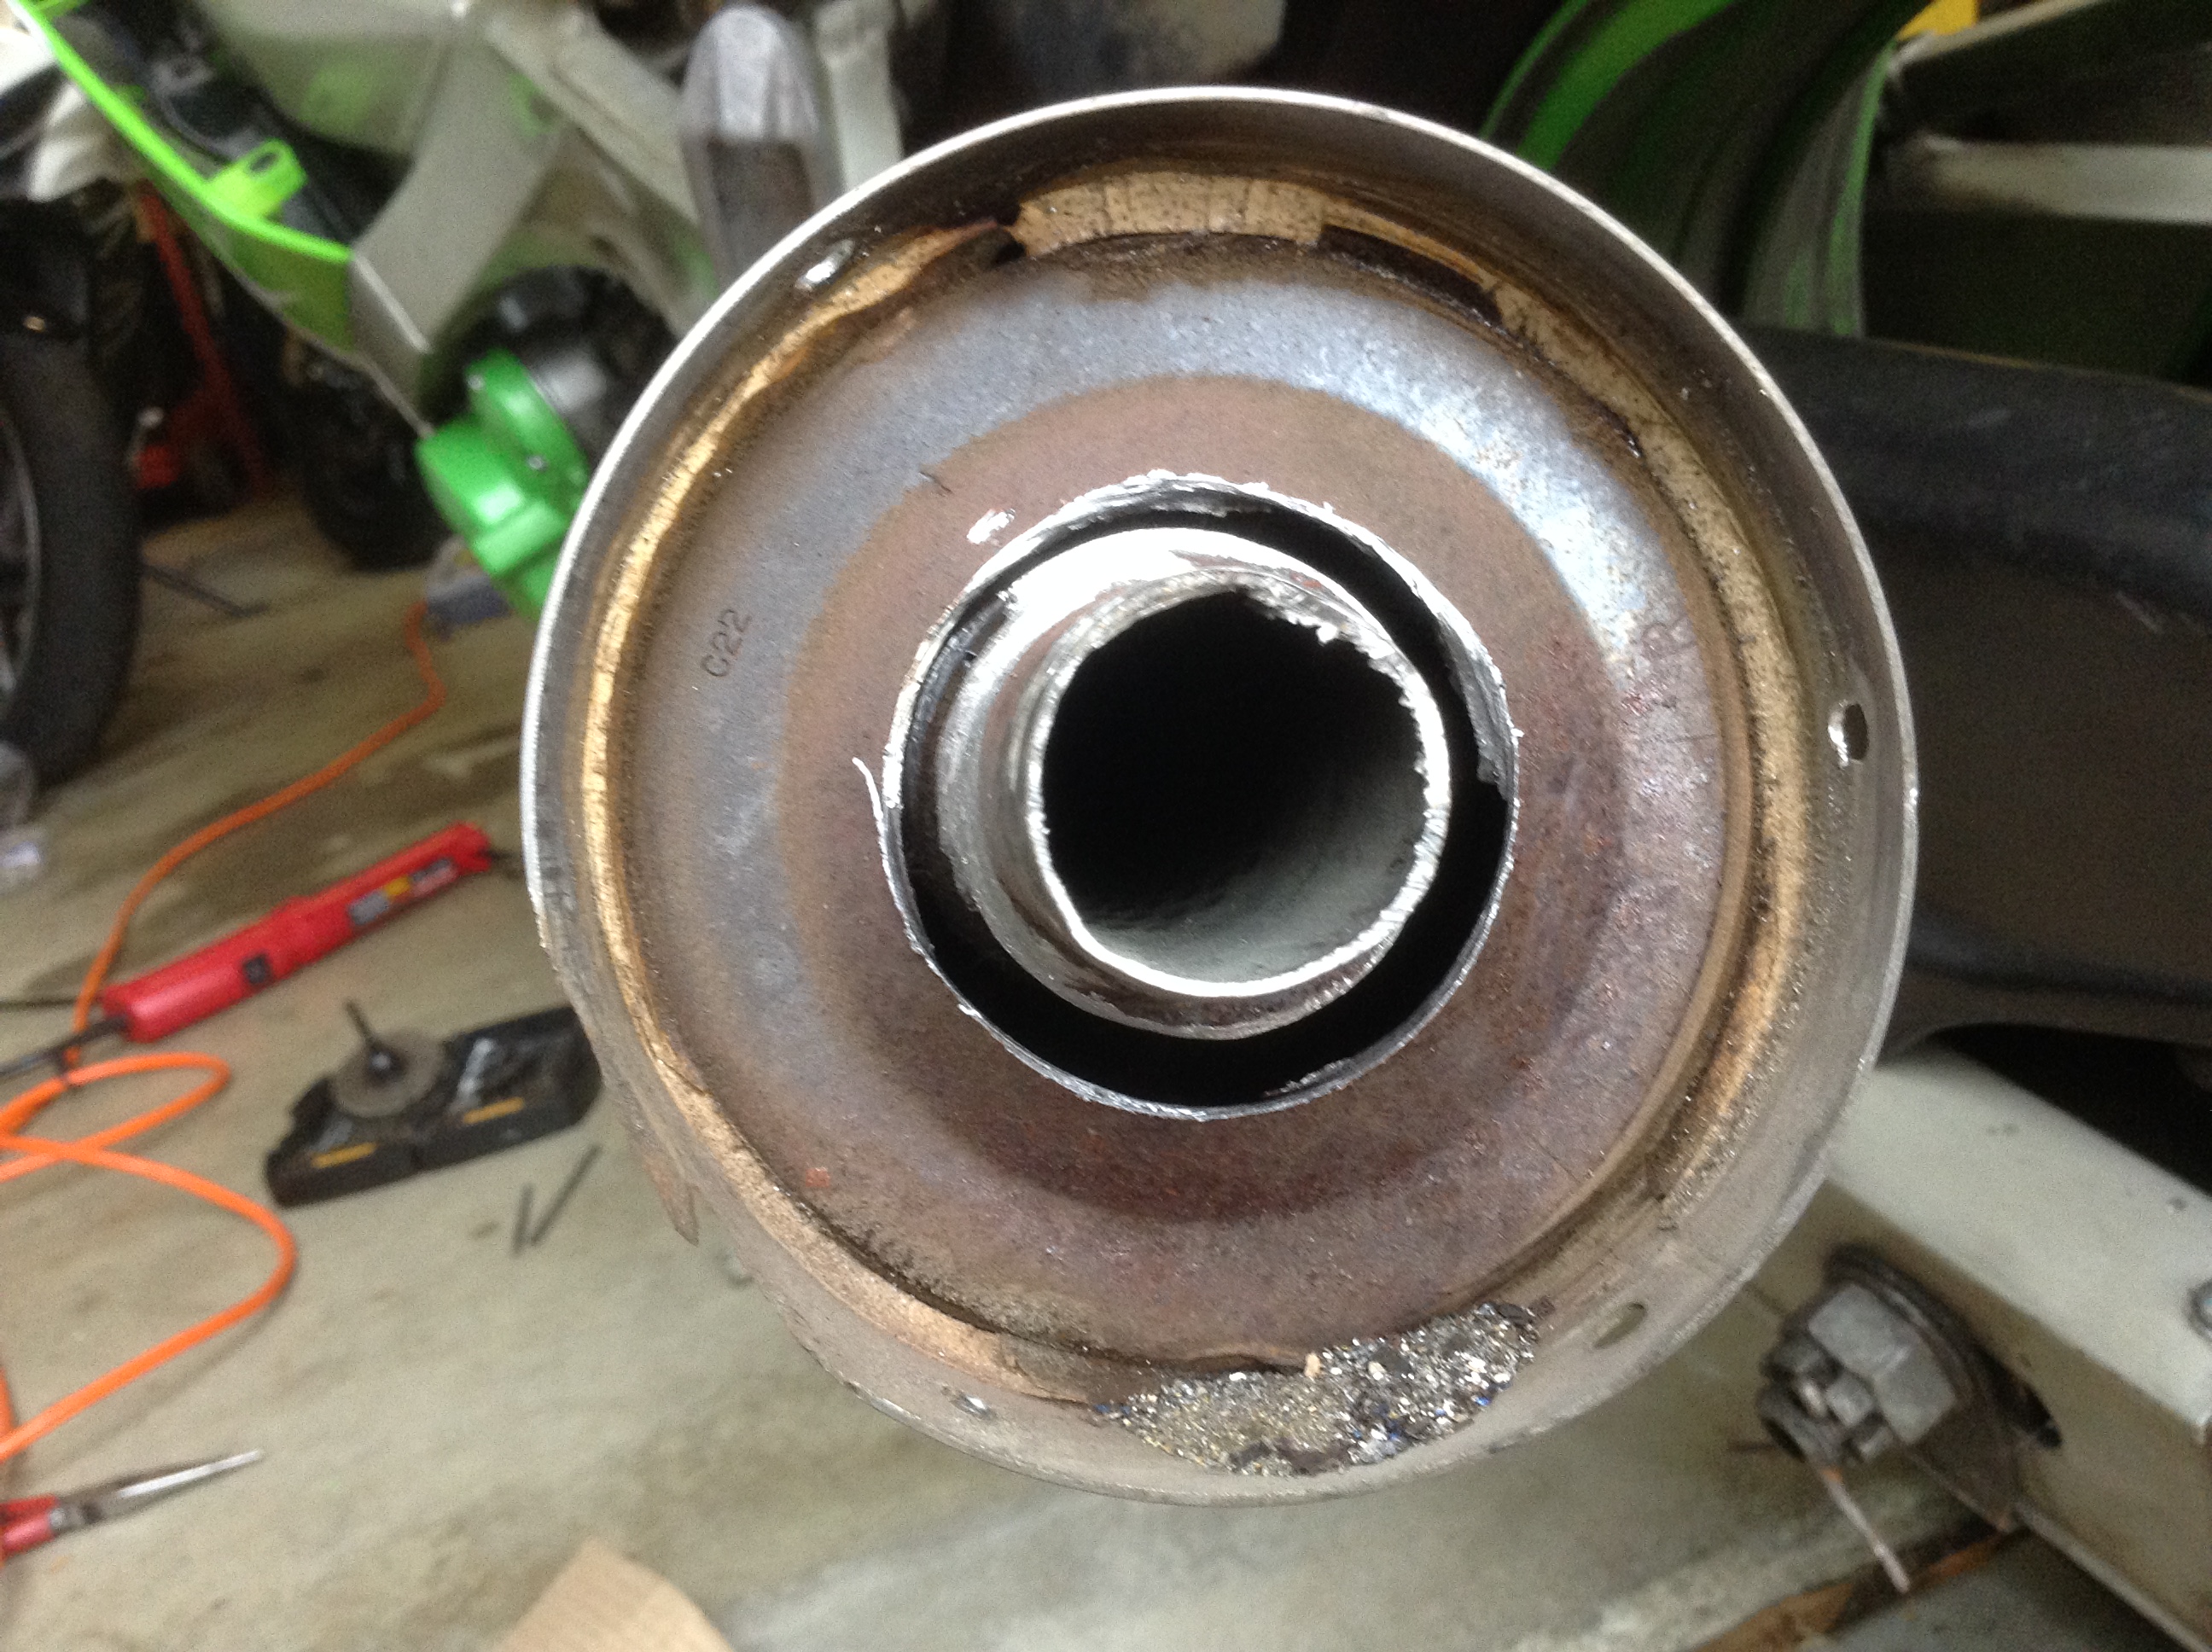
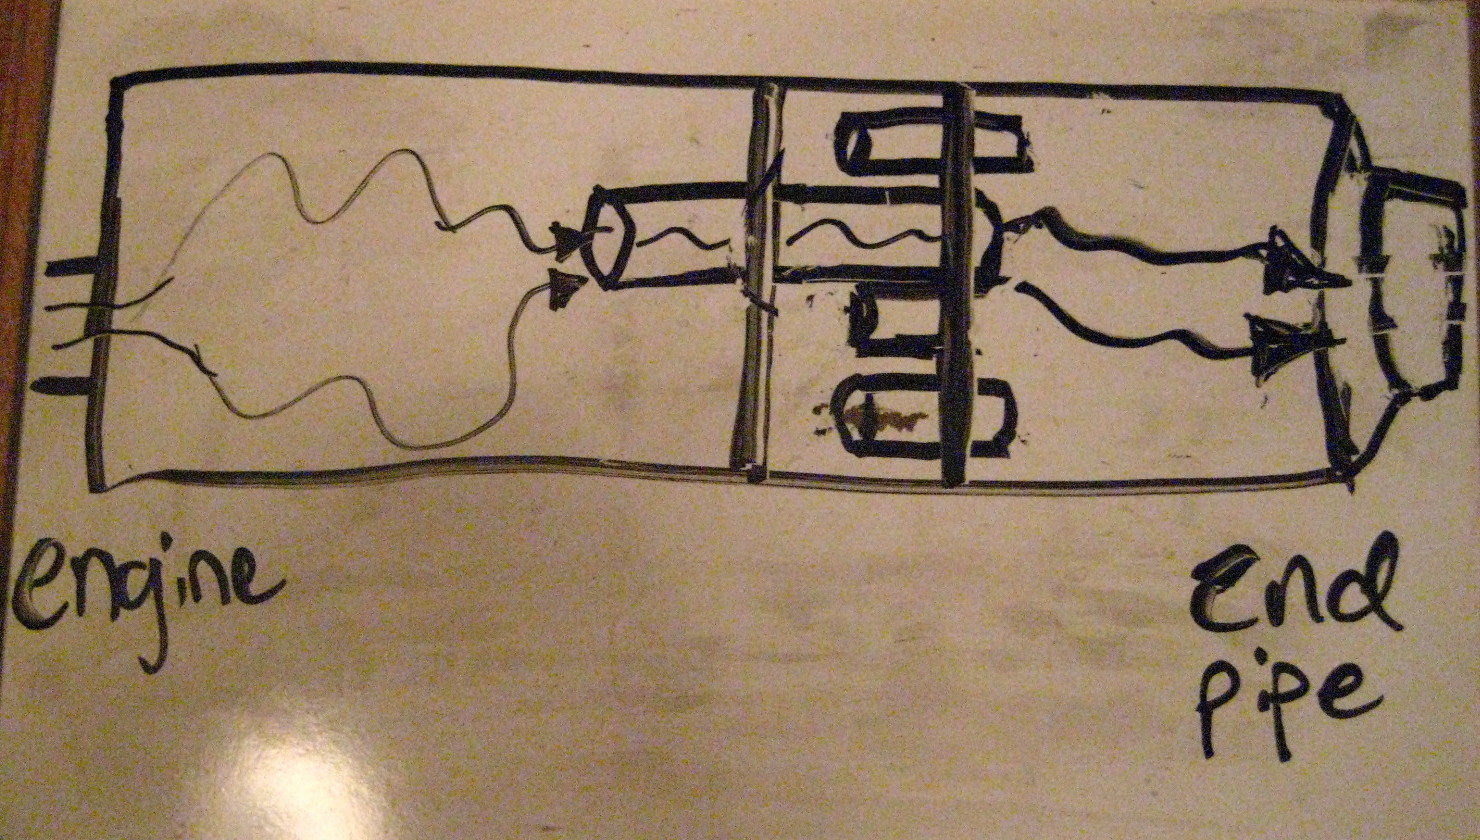
You can now see the insides of the muffler. You are looking at the plate of the middle chamber.
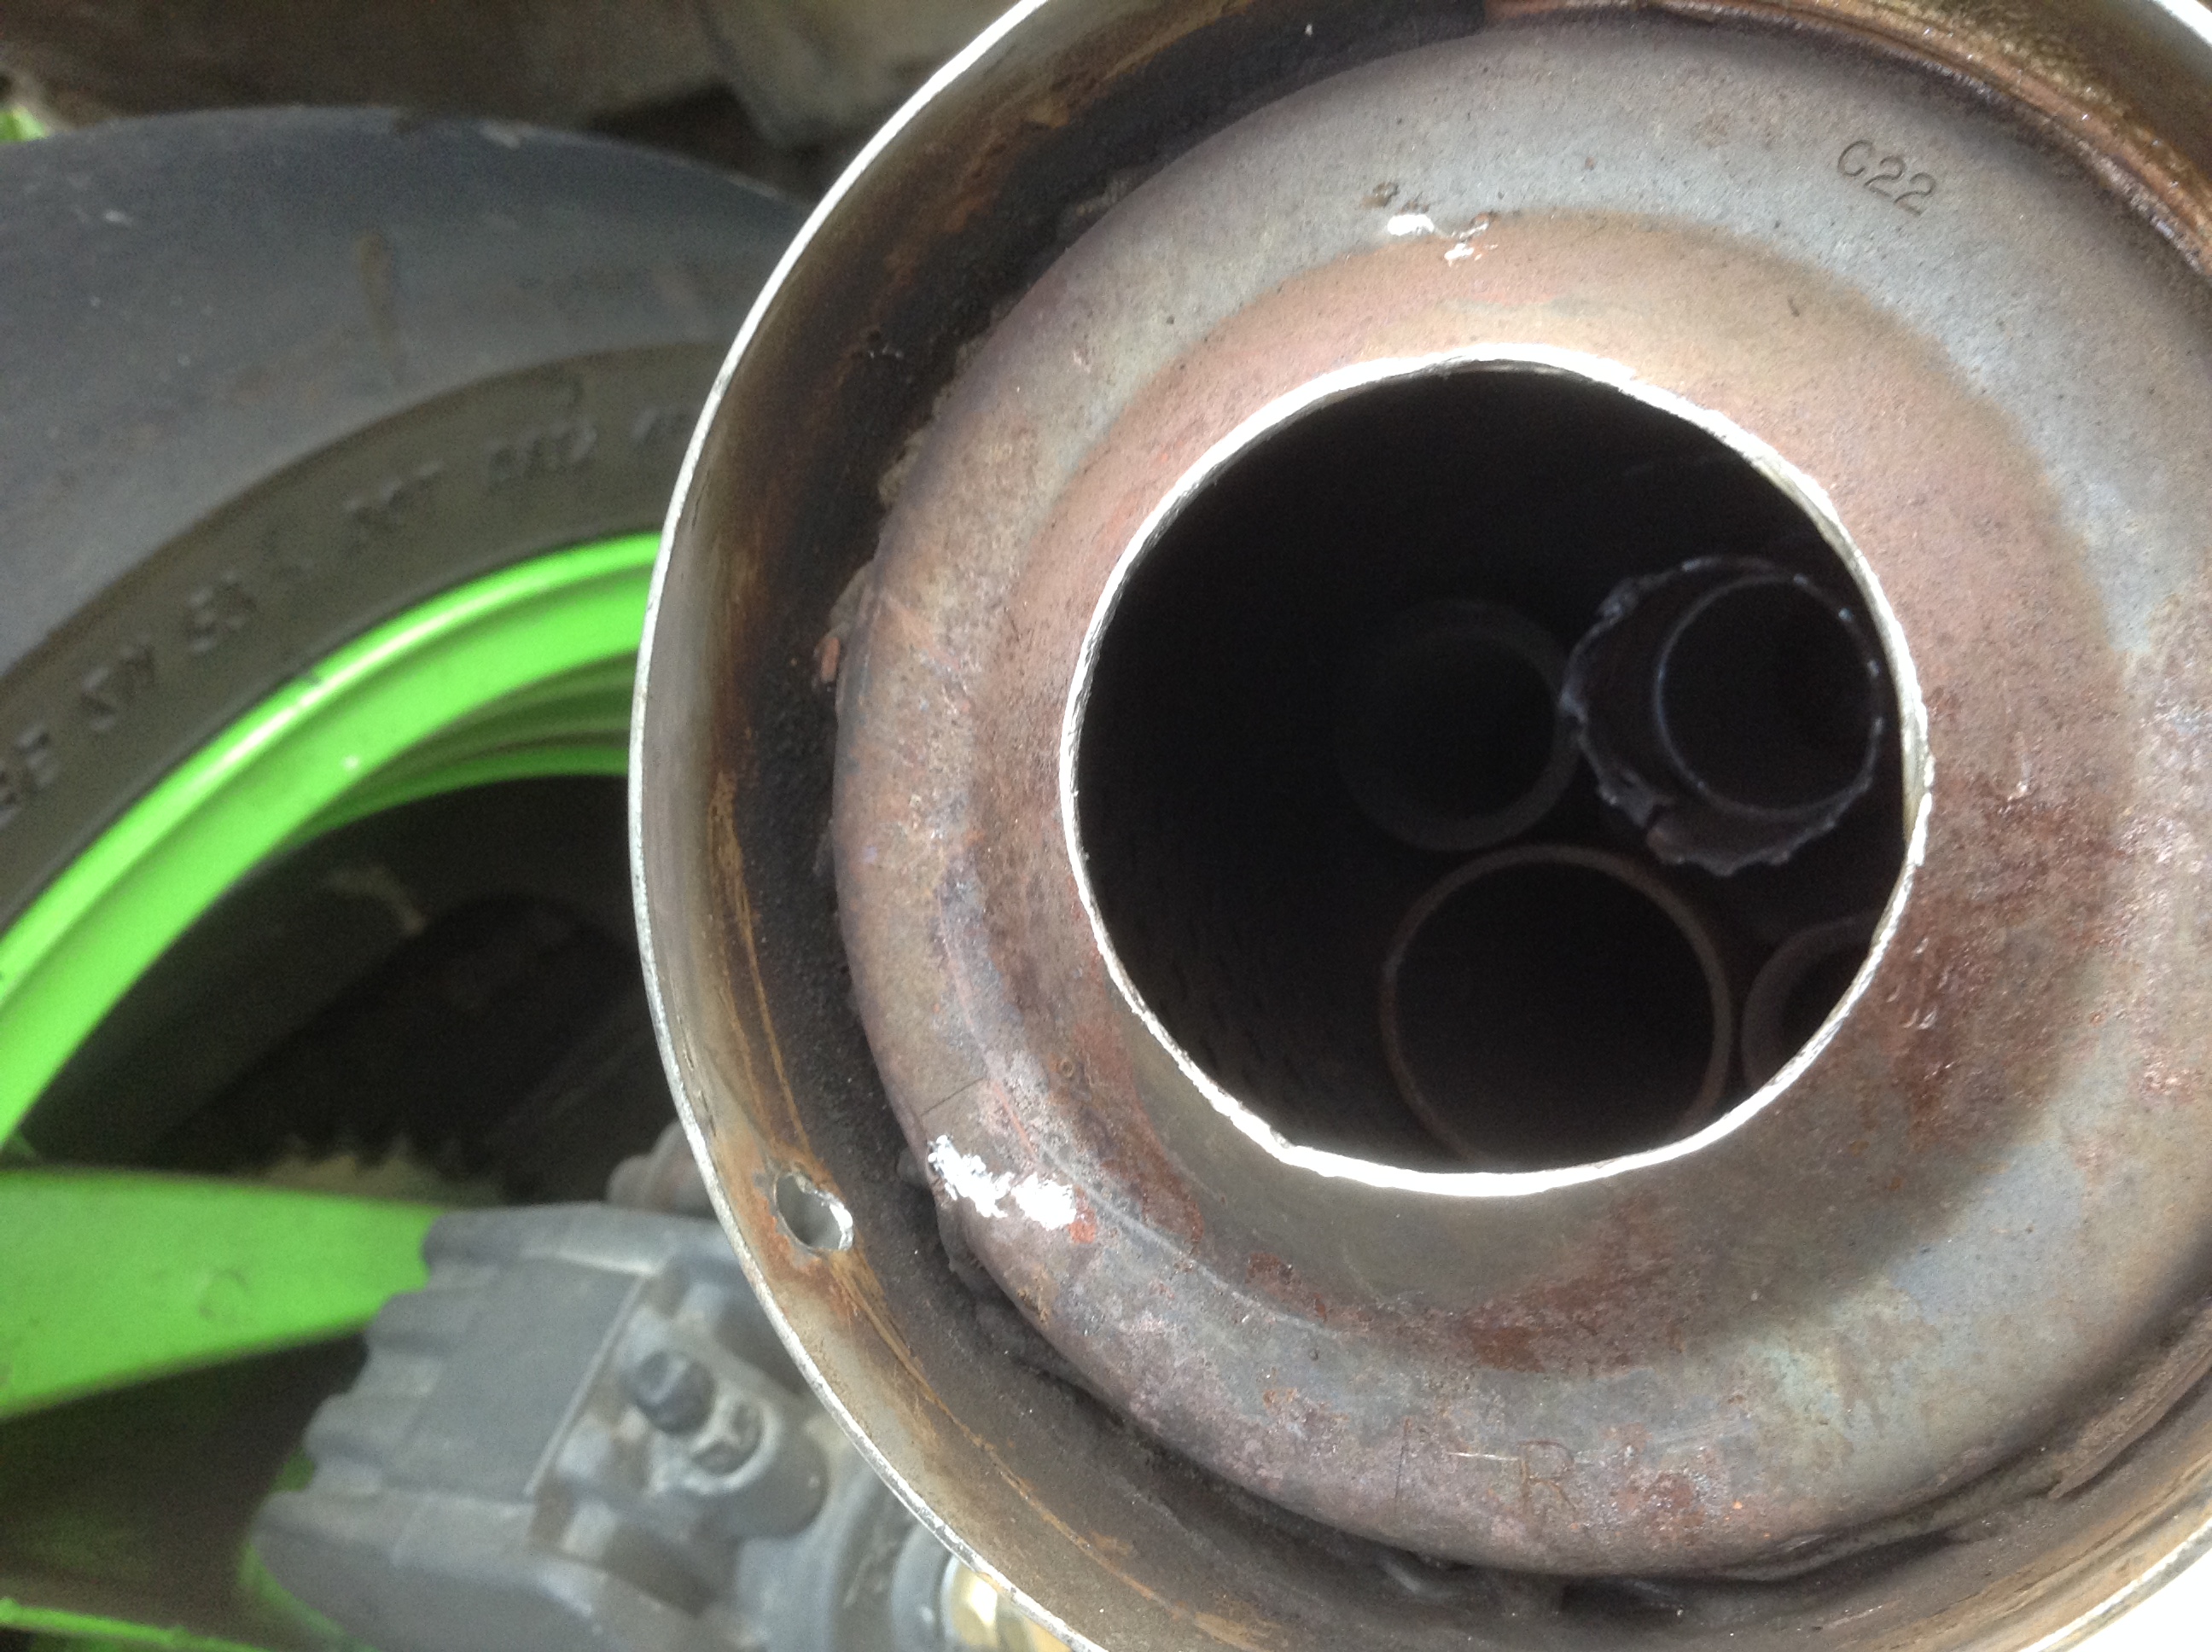

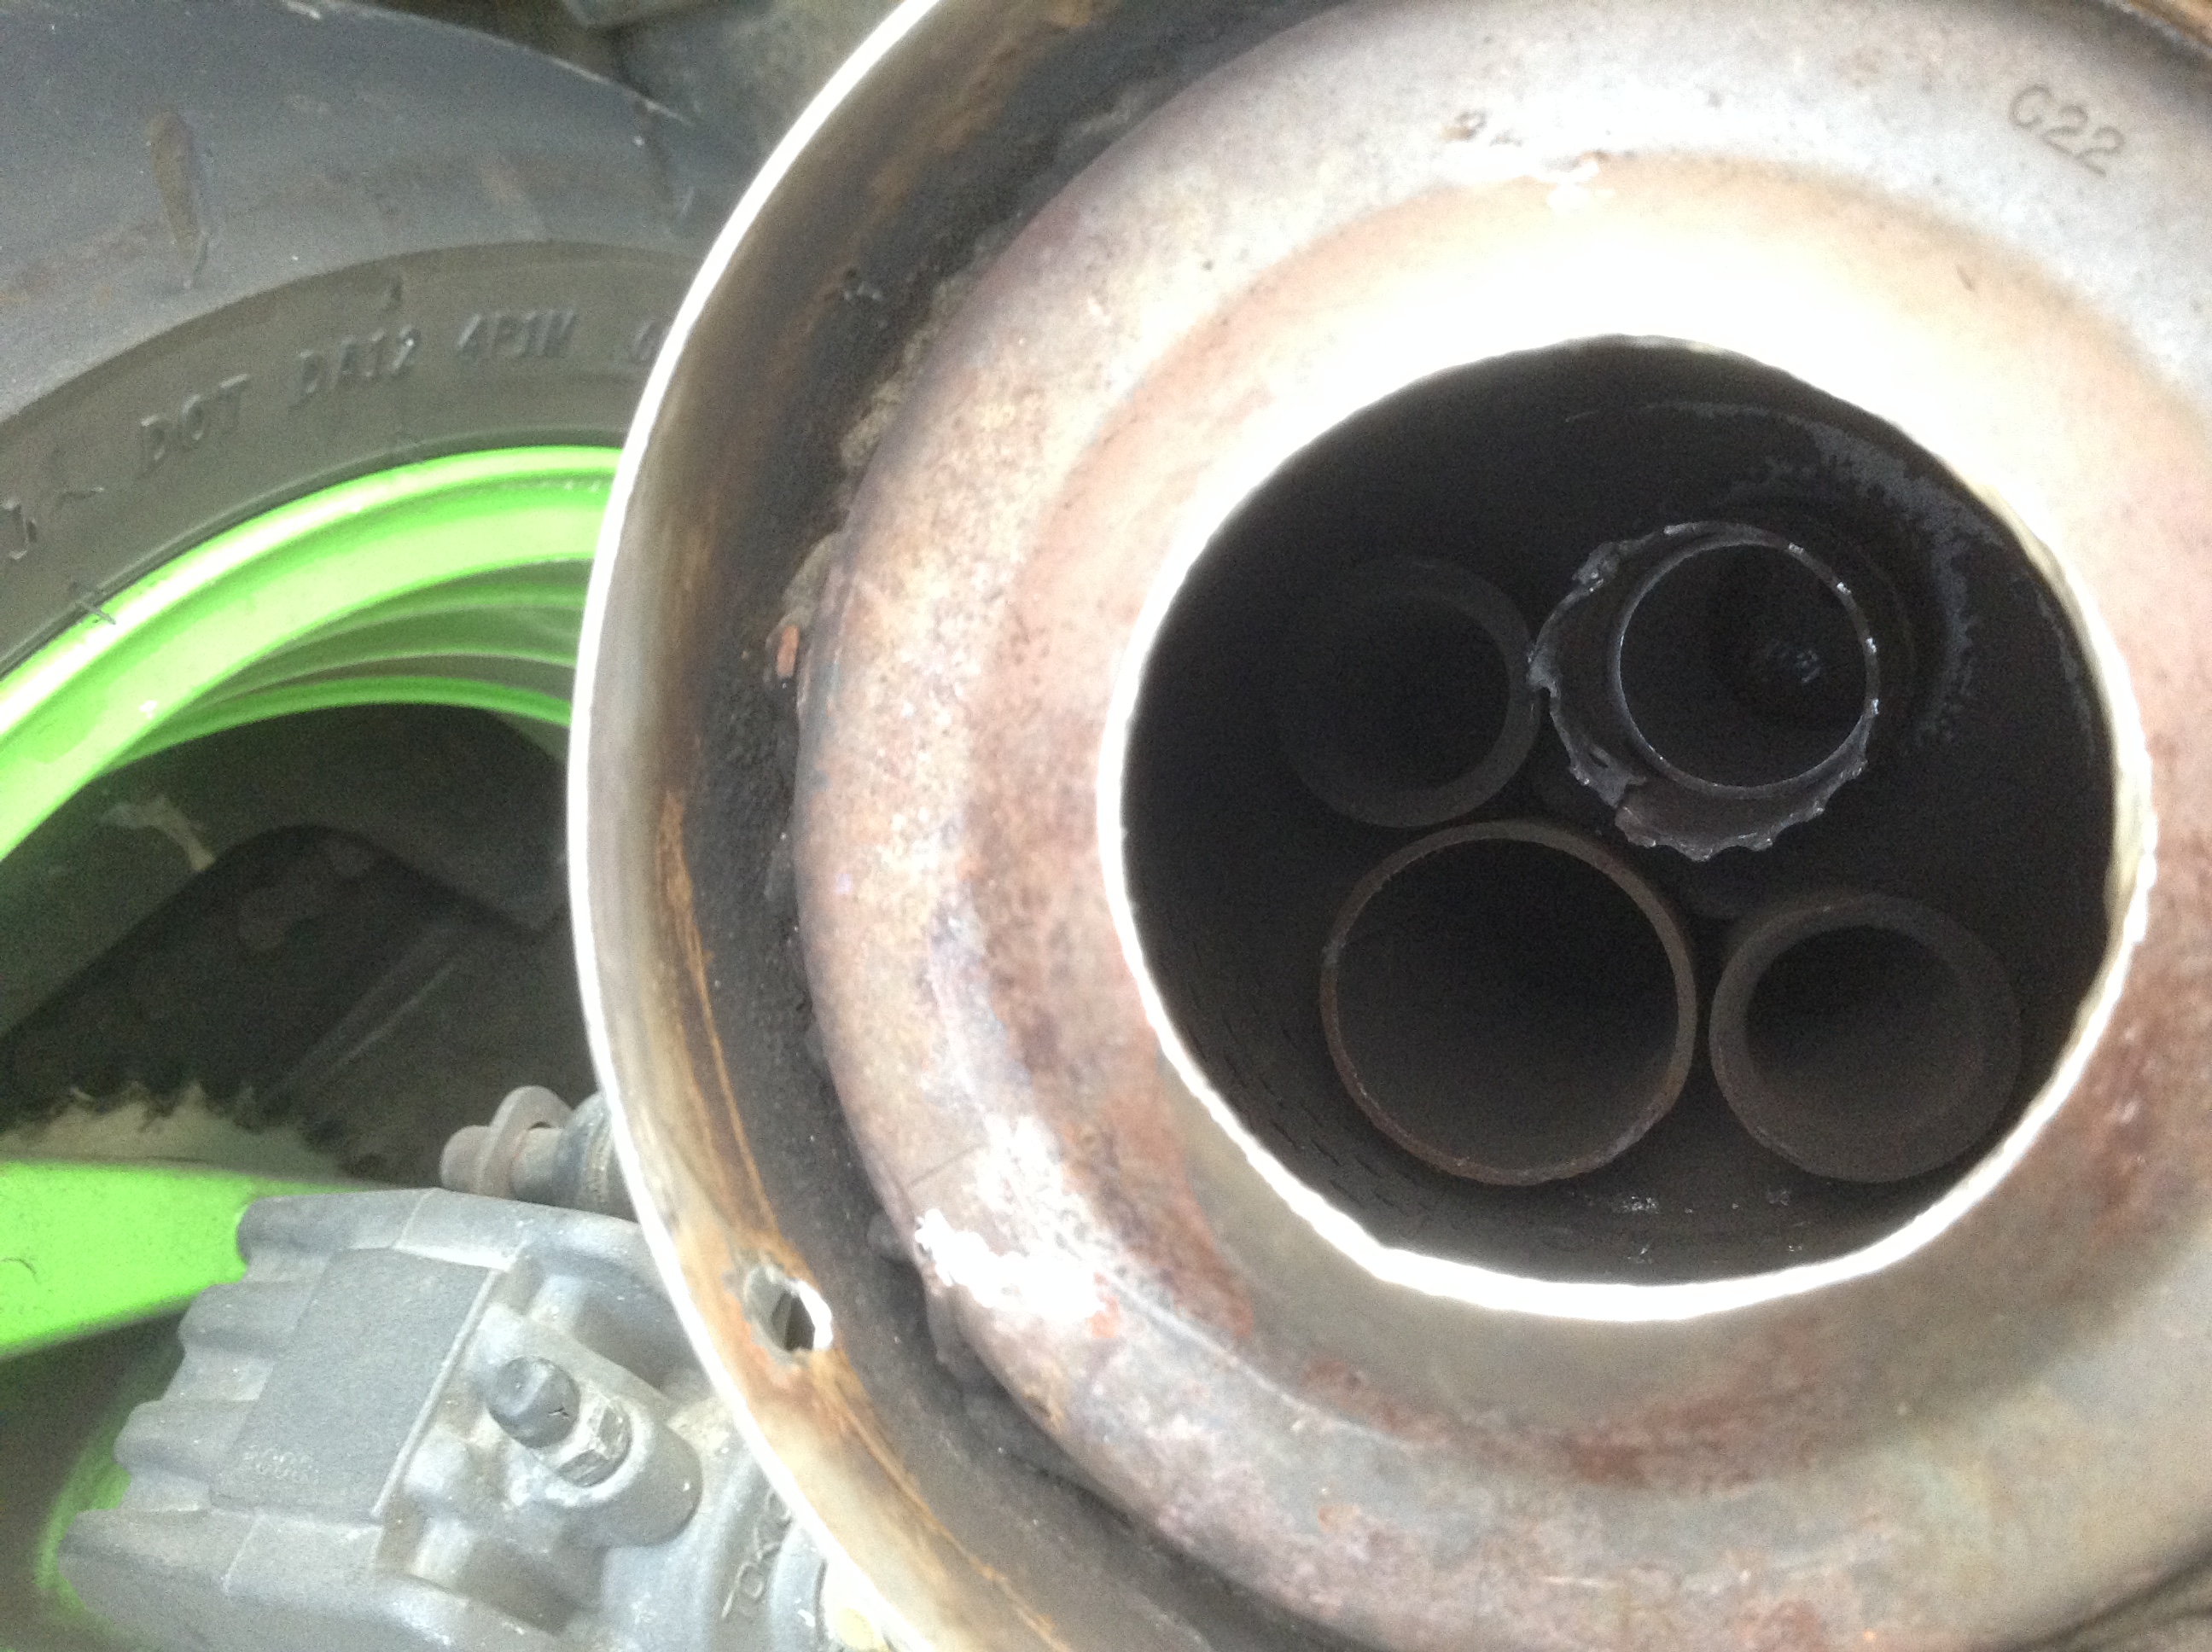

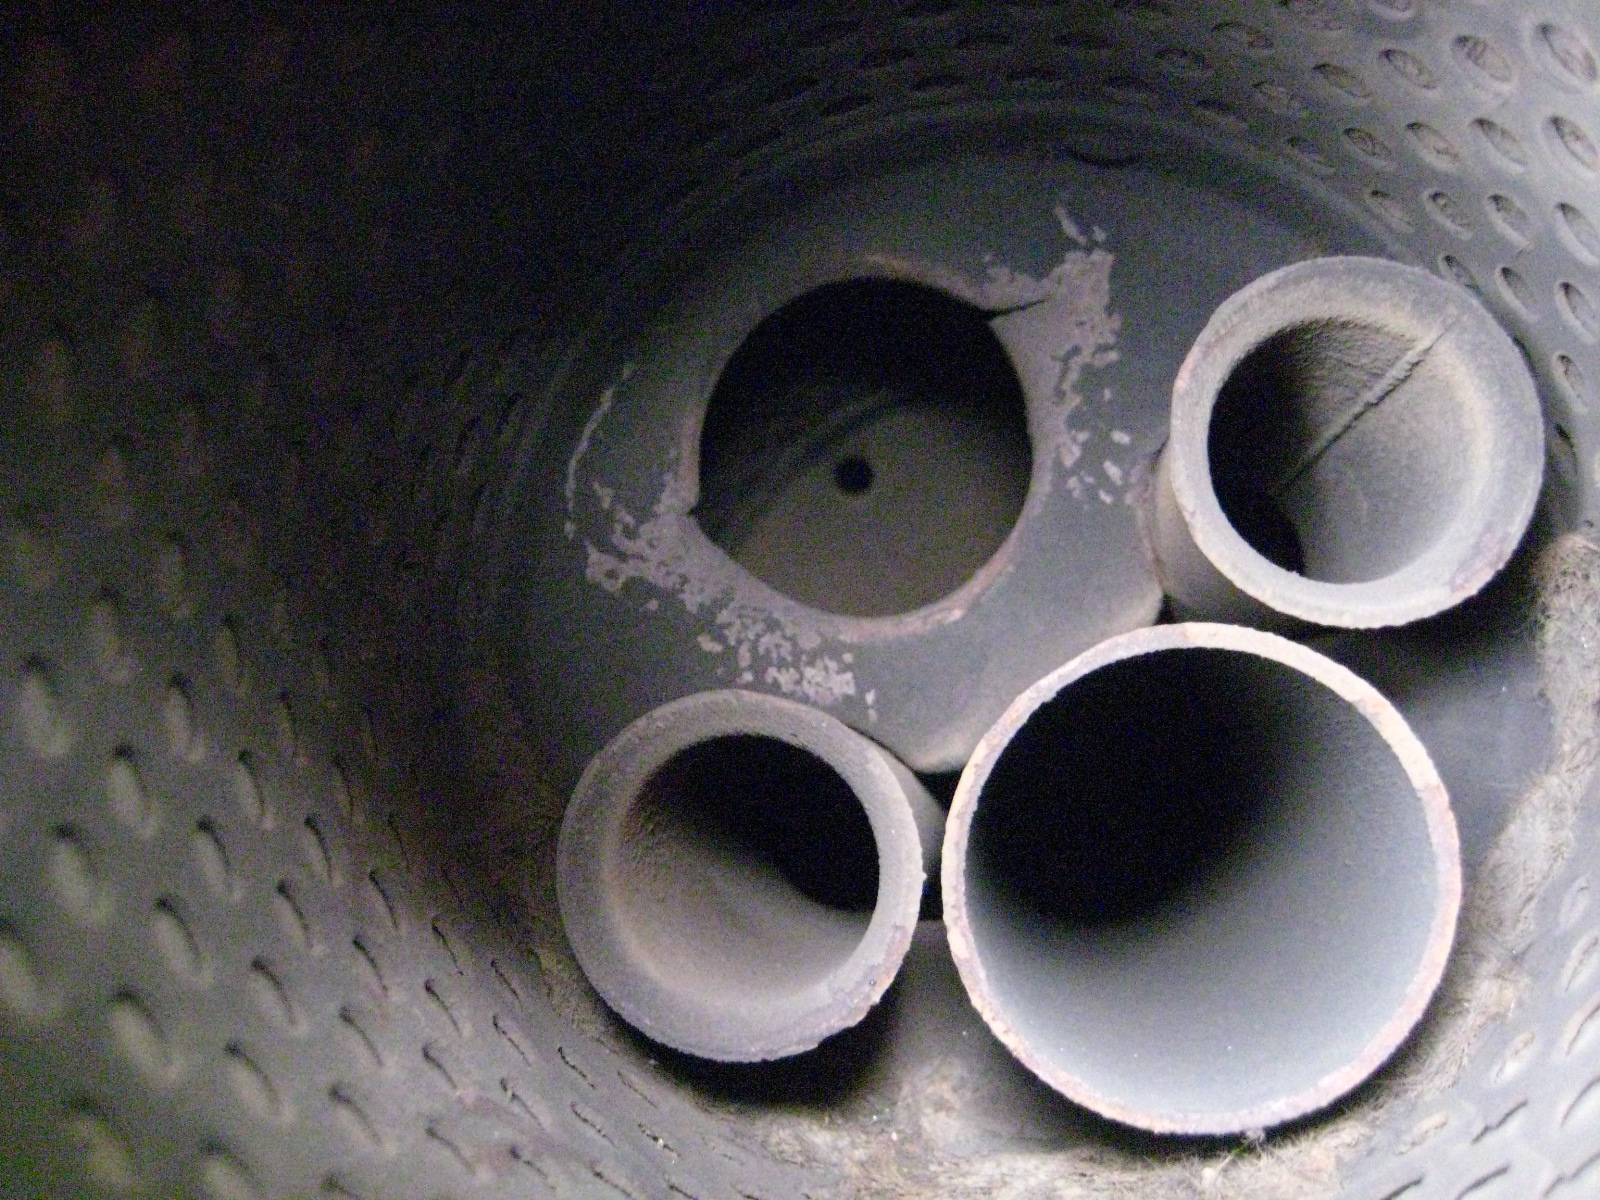
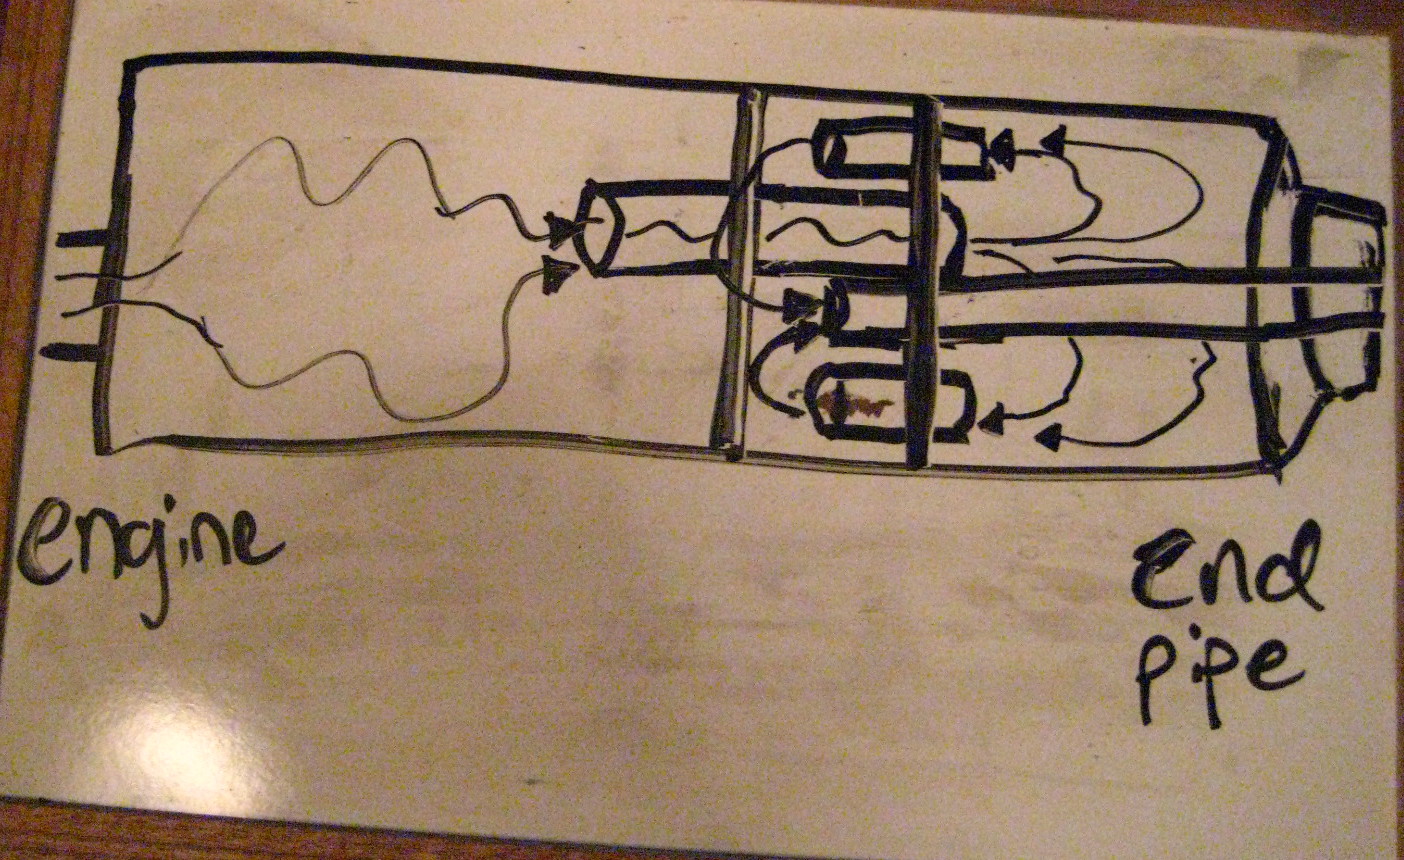
These exhausts have 3 separated chambers. What this mod does is effectively eliminate the middle chamber AND cuts out a large back and forth pattern the exhaust gases used to have to follow backwards into the middle chamber and then out that small final tail pipe / baffle. With it gone, the gases enter the first chamber and then exit out the larger diameter pipe, bypass the middle chamber altogether now, and then exit into the rear chamber and have free outflow out the back now.
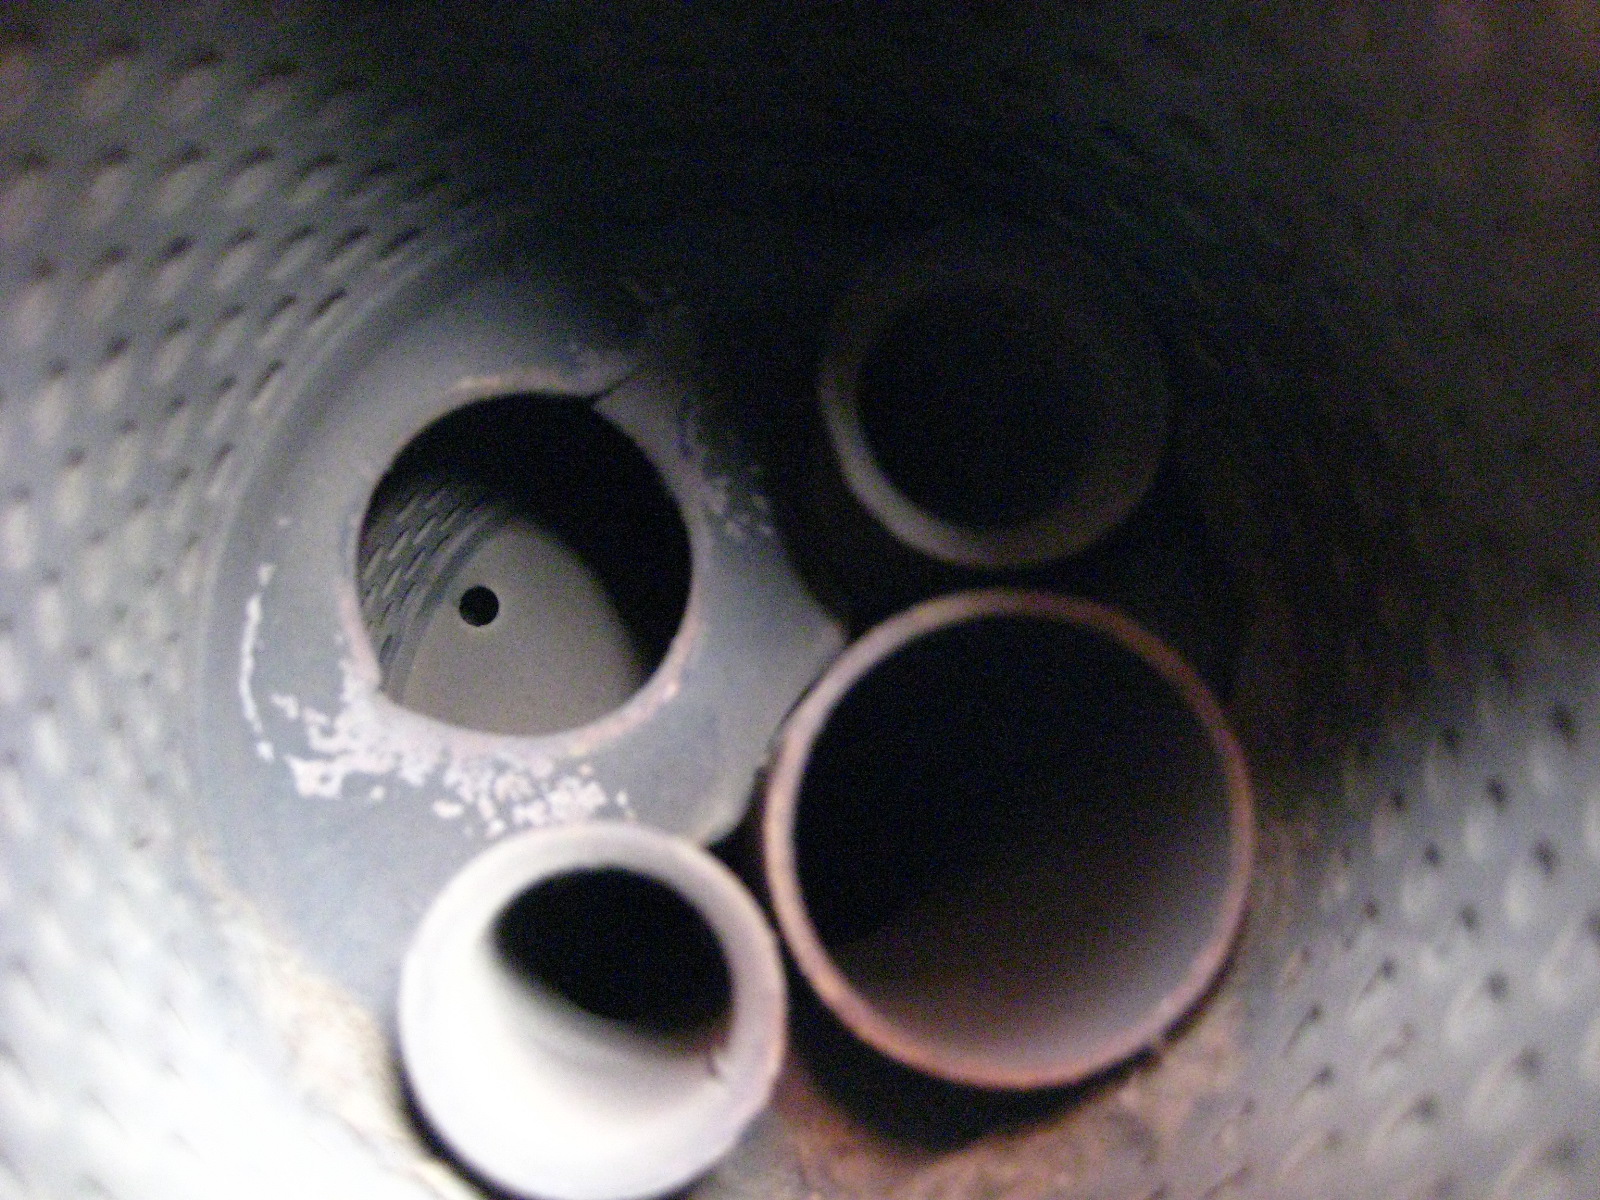
Before:
After:
Here is a photo of an ‘exploded’ stock muffler:
Yo
Result?:
It sounds SO much better than stock. Idle is amazing with a nice throaty burble. Cutting this all out rather than drill holes around the end tail pipe makes it deeper / bass-y sounding, and not raspy at all.
Depending on load and throttle position etc… it can get a little loud and drone starting as early as 3500 and through 5000 rpms. Again, depends on several factors. By 6000 + the exhaust sounds sweet and great!
My bike idle smoother at lower rpms with this as well. It burbles nicely, it really sounds fantastic.
This little mod has totally changed the feel of the bike. It was such a quiet bland exhaust before. Some people have done this and found it too loud for them.
I have worn earplugs riding for the past 2-3 years to protect against hearing loss (from wind noise), and I LOVE this exhaust with my ear plugs in. I am also noticed more by cars driving around as they have more of an audio warning I am nearby.
I will posting a proper comparison of the before and after video with same video gear with the same manual settings so you can hear the difference.
It’s a free exhaust tone modification and I did it in just a few hours on the weekend. Enjoy!
Posted in DIY, repair and tagged baffle, chop, debaffle, debaffle cans, debaffled, exhaust, exhaust mod, Kawasaki, muffler, Ninja, stock exhaust, Zx6e by green
Fuel hose Fuel Line size diameter 8mm I.D. 13mm O.D.
I’ve spent a lot of time searching for this info and finally figured it out. It’s hardly disclosed really anywhere.
ZX6E / ZZR600 use 8mm I.D. (Internal Diameter) fuel line / hose, with a 13mm O.D. (Outside D.)
In a pinch you could substitute 5/16″ hose as that seems to be much more common. You don’t need the common really thick auto parts version as that is used for higher pressure F.I. motors and we don’t need the thicker reinforced walls for carb low pressure fuel. Worm
One suggestion, Parts Unlimited makes a clear blue tinted fuel hose that is 5/16″ and they say long lasting and chemical / fuel resistant and fairly kink free (I think it’s polyurethane based). I got sold some 1/4″ Parts U. from the local Kawasaki dealer for my bike (wrong stuff – too small), and I have crammed it on, but it’s a p.i.t.a. to stretch onto nozzles, and then your old fuel line clamps won’t work as the O.D. is too small. It is pretty flexible stuff, stronger than stock it seems and it’s nice that you can visually see fuel in the system and moving for diagnosing / reassurance. It would be good for pump to carbs, fuel filter to pump, and probably pump to fuel tap / petcock runs. The short main and reserve to petcock / fuel tap runs have some pretty tight turns in them. So far I have left them and might order stock lines there.
BMW E28 era cars also use the same hose. You could get some 8mm from a BMW dealer.
Posted in DIY, repair and tagged aftermarket, diameter, Fuel hose, Fuel line, Kawasaki, kind, Ninja, replacement, size, sizing., type, Zx6e, zzr, zzr600 by green
Just fixed replacement clutch cover leak, fan comes on!
Mileage: 58,250
So I figured out what went ‘sideways’ on the replacement clutch cover install – the damn gasket. I reused the one I had made before for it. And it slid up into the engine area a bit and right at the most sensitive spot there was no gasket at all!
Hence the instant leak the bike goes upright (let alone runs) and oil is in that area now.
I also topped off the coolant (after the radiator thermostatic temp switch swap), and then started the bike on the center stand. No leaks. I let it warm all the way up to the middle of the temp gauge and the radiator fans came on!!
That’s a first in a month, so a good end to the day after and idiotic hole punch destroyed my last remnant of gasket paper this morning. I was cutting a new one, and then it was ruined. I was irate. But now I am happy!

Posted in repair by green
Replaced thermostatic fan switch
mileage: 58241
My radiator fan has not come on in last 2 weeks or so that I know of. Even in hot weather stuck at light after light – I have to avoid those. My temps can go past the halfway which is far too hot. The bike starts to run a little stumbly and the clutch operates worse. Everything feels a bit ‘rubbery’ – I can tell when the heat is getting too much. It probably doesn’t help that my left ignition coil is not in good shape. I got the clutch cover, switch and the 2 coils with wires and boots from the old z6xe.com forum member from North Carolina for a nice price.
I have to go a constant 35 mph to maintain just below half on the gauge, it’s been pretty stressful commuting 10 days to work with stopped traffic.
Hope this solves the issue. I had pulled the wires about a week ago, and shorted them and the fan came on right away, so this is the test to see if the switch has failed or it’s another electrical issue in the circuit.
Posted in repair by green
Maintenance log Green Magic

43,174 8/15/12 Purchased!
43,295 9/16/12 Carbs cleaned (2 pilot air jets clogged), New fuel filter, clean & oiled Uni air filter, cleaned plugs, re-routed 2 hoses properly, blew oil out rear canister hose & rerouted, mixture screws reset from 3.4 turns to 2 turns, re-set idle adjuster.
9/20/12 throttle cable adjustment fixed, R/R wiring chopped and fixed.
10/08/12 New AGM battery
11/28/12 cleaned carbs again (were pretty clean).
11/30/12 fuel pump tested ok, checked for spark ok
2/8/13 43,305 Holy shit! Green Magic is back from the dead! NEW spark plug wires installed.
2/16/13 Oil change #1
2/26/13 installed painted green windscreen, fuel line clamps installed
4/8/13 blue carbon fiber seat cover installed
4/24/13 white mirrors installed
43,697 5/2/13 replacement regulator / rectifier installed
43,950 6/16/13 coolant replaced and flushed
9/30/13 chain tension checked and ok less than 1.3” slack
9/29/13 Double Bubble windscreen installed
45,381 2/1/14 Green LED gauges installed! installed ram air guards
46,439 5/4/14 Tire swap #1 to Dunlop Q3
46,931 5/17/14 Oil change #2, epoxy try on stator cover (x)
47,292 5/24/14 ZX10R rear caliper installed w steel line
47,696 balanced rear wheel
49,469 10/13/14 New Clutch, stator cover leak fixed + painted. replaced clutch rod
Oil change #3 – Rotella T6 and Purolator from now on.
51,600 2/23/15 cleaned carbs, cleaned out starter jets, last 2 new float bowl gaskets installed
53,884 3/16/15 Oil change #4
54,860 4/26/15 Tire swap #2
54,860 Nissin brake calipers mod installed ’05 F4i brakes, front and rear brake fluid swapped.
2nd re-crimp of R/R wiring. Shock pulled and Fox TC lined up.
55,318 6/10/15 water pump repair started
55,435 6/13/15 “Hot idle” problem fixed – loose coil spark plug wire deterioration issue.
56,284 6/20/15 re-balanced front wheel, brake cleaned front brakes
57,320 8/9/15 sanded off gas tank p.o. damaged rust spot and painted white, JB Welded cracked clutch cover
57,998 8/22/15 installed replacement Kawi front brake lever
58,241 8/27/15 installed replacement thermostatic fan switch
8/30/15 installed replacement clutch cover, green painted clutch lever,
bar end for drop damage, clutch knob
57,998 8/33/15 Adjusted chain slack, reconnected speedo cable that had fallen out.
58,321 9/6/15 Oil change #5
58,250 9/3/15 fixed replaced clutch cover leak, verified fan comes on. re-bent clutch lever back.
10/9/15 clutch lever stripped to bare metal aluminum at D.C.
59,646 11/02/15 rebuilt fuel petcock (didn’t need it).
59,982 11/08/15 Exhaust mod. Chopped out baffles. Debaffle. Installed new 5/16″ Parts Unlimited fuel lines
60,401 11/18/15 Valve adjustment job. Ignition coils replaced (both). New spark plugs, adjusted throttle cables.
62,470 2/12/16 Gold X Ring chain and sprockets back to factory 16/48 teeth. 3rd set of tires: Michelin Power Pilot 3
63,134 2/23/16 Oil Change #6 (Pleasanton street after shoot #97)
63,325 5/9/16 stator to regulator / rectifier re-wire upgrade to 10 gauge THHN wire (2 white and 1 black runs)
63,465 6/28/16 carbs dumping fuel. 3x, 4th after running bike with petcock ‘off’ and sitting 2 hours and no leaks
63,567 7/1/16 headlights lo and hi beams repaired. Hand grip wired back to stock. New lead back of R/R white stator to junction box old yellow connection (new blue wire).
Posted in DIY, repair by green
Work on the 1978 CB400A top end engine project begins in earnest
Finally tore into the engine oil blown gasket issue today on the Honda CB400A motorcycle. Doing it as a favor to help a friend get the bike back in sellable condition.
The lower cylinder to crank gasket blew while I was riding it on the highway.

Got the tank off and the valve cover off. Will adjust the valve timing tomorrow.
The oil which was way overfull with oil or fuel leaked into it through the carbs and into the intake and down through the piston rings into the crank. This caused intense pressure and this model doesn’t seem to have a crankcase vent so I guess the valve cover vent serves that purpose. The pressure could not be released fast enough and blew the lower seal out. Evidence abounds that recently oil sprayed out of the upper hose connection to the air box, and oil all over everything where the tube exits the air box to drain by the back wheel. It blew oil all over that whole area – it should not have, should just be steam and hot air coming out as needed.
There are two plans, A & B.
Plan A:
-Replace all the (contaminated) oil.
-Re-Torque all the head bolts – which apparently are weak on this model and loosen
-Adjust the valve timing while in there anyway.
Button it all back up and test fire it up to see if the leak goes away.
I give this about a 1% chance of working tomorrow. But 4 people advised me to try this first.
Plan B:
Go back into it.
-Remove valve cover
-Remove the head bolts
-Remove the valve train and rocker arms and lobes
-Remove the cylinder head.
-Removed the cylinders themselves.
-Install all new gaskets all around.


Posted in repair by green
White pain tank ding, JB Weld clutch cover
Dropped the damn bike on Monday. Finally had time to look at it and decided it was worth trying to JB Weld it and see if it could hold up.
ALSO!: Finally, ground down the original p.o. gas tank damage where the handlebars bent and slapped into the tank. Then sprayed it white, several thin coats, maybe 6 or so.
Yesterday I managed to score a white spray paint can, moto chain lube, and rustoleum clear spray all for free at the Alameda County Hazardous waste free cycle hut! Was pretty stoked! The tank looks SO much better now!


Posted in repair by green
Re- balanced my front wheel, fixed brakes
Mileage: 56,284
Finally got my front wheel off – had to borrow a 14mm allen wrench was I kept breaking bolts with the triple nut snugged up method.
I hand balanced my wheel again using some cat litter boxes that I leveled side to side and front to back. I find out two days later my re-balance worked Great!! Waay better than the $5000.00 balancer machine ‘that woman’ ‘balanced’ my tires with. Look at all the wheel weights I had to remove! it was way off. Made the Sonora Yosemite trip at speed not fun.
Also with the wheel off, I hand cleaned all the brake gunk off the right side rotor (and what little was left on the left rotor) and shot it all up with brake cleaner.
Wow! Do these Nissin caliper brakes finally brake!


Posted in repair by green
Water pump rebuilt.
I can indeed confirm this Honda oil seal part fits the ZX6E / ZZR600 model:
Honda part #: 91201-MF2-003
description: OIL SEAL (12X28X7)
price: US Dollars $4.99
I had to special order the part and installed it today. Very nice fit. This is the oil seal that goes around the impeller shaft at the very end (not the wider O Ring that goes around the water pump impeller housing.
Posted in DIY, repair by green
Started the water pump repair finally
mileage: 55,318
After finally getting all the flipping parts – all special order except the bearings – I got down to business.
I drained all the coolant and pulled the pump out, which all went easily enough. I was cleaning the housing for about an hour when I noticed to my horror there were multiple cracks in the back cover housing!
So I realized this must be where all my oil leaks had been coming from – not the actual oil seals in the pump.
I started desperately searching CL and fleabay for any water pump, seized or not.
I posted on BARF looking for a Kawi pump, and got a quick answer. He pointed out that whole area only contains water and with no residue and water leaking it could not be leaking. He called them “casting errors” which I think is quite generous to Kawasaki but… I realized the guy was right, there was no leak through those cracks and couldn’t be oil coming from there anyway.
Anyway, after thinking about it all a bunch I elected to simply JB Weld the outside of the case cover and let it sit overnight tonight.
Tomorrow I will replace both oil seals anyway, and then reinstall it all and test it out.
Originally I was going to do the full rebuild, replacing the two bearings and another seal, but when I pulled the water pump I noticed the rear shaft is very tight and there is zero lateral and back and forth play. It feels rock solid, so at this point there’s no need to get in there to replace the bearing, and perhaps risk not having the right loctite type sealant on hand for the mechanical seal cup.


I’ve been riding the bike about 4x very reluctantly to work over the past 8 days. Originally, I was worried my pump was shot and coolant was getting in the oil and my motor could seize. But the oil looks totally normal in the engine, and no coolant has ever come out the weep hole, so I think I’m ok there. I don’t think the oil and coolant ever mixed.
Although I will say my coolant looked like shit. There was dark small sediment in it, wasn’t a pretty sight. I changed this all out about 2 years ago and it’s gone south quick.
Here’s the nasty coolant I pulled out of the machine – the worst bit of it. I swapped the coolant and did a flush about 2 years ago, and it already had all this sediment in it. Yuck.


Posted in repair by green