“motorcycle week” complete. Maintenance
mileage 54,860
I swapped out both tires to a second new set of Dunlop Q3 tires. I really liked these tires last year. When they are fresh there is nothing like them.
I also upgraded my front brake system. I did the full CBR Nissin caliper swap.
It’s well documented on the http://www.zzr-international.co.uk site.
I opted to drill out and tap the Nissin calipers themselves, so I jumped up the bolt in size from 8mm stock Honda size to the stock Kawi size: 10mm 1.25 pitch bolts.
This enables me to use the stock Kawi bolts and easily switch back and forth if there is any trouble.
I used the included used pads – for now. I did a full brake fluid change, flush and bleed with DOT 4 synthetic fluid. I also did my 2nd change and flush of the ZX10R rear caliper while doing the front.
I happened to have the left tail fairing off, and for some reason decided to pull the regulator / rectifier connector. The wiring was frying out again there, 2 of 3 stator yellow wires were crispy and cracking, as was the white wire. I chopped out the bad bits and re crimped on connectors and plugged it back in.
I also pulled the rear stock shock to size up the feasibility of trying to adapt my ’84 Honda Interceptor VF750F based Fox Twin clicker.
Stock shock back in, brakes fabricated, tires on, wheels back on, and fairings back on.
Result: I had to cram in all the final brake assembly, bleeding and fairing reassembly as the place I was house sitting and working the owner came back a day early. As a result, I spilled quite a bit of brake fluid around, and when I drove off that night at 11pm the front brakes were not functioning wonderfully. Inspecting it later the next day after driving 50 miles, I noticed some slimy stuff on the rotors – looks like brake fluid and dirt shoved to the edges of the rotors.
The brake lever feel was much improved, but again, with old used pads (with a lot of meat on them), and the gunk on the rotors, so far the braking is so-so. Maybe a slight down grade in performance.
But verifying again a few days later, I don’t it’s the rotor’s fault at all. In fact, when I pulled the old pads to check everything all the caliper pistons looked nice and neatly pressed in from where I had forced them back with my hands while installing. Everything looks good with the calipers. I just cleaned the gunk off, made sure to dry off all traces of brake fluid, but now I need to wait to test them again as I am pretty sure my water pump is toast.
Posted in repair by green
Nissin CBR Honda brake upgrade fitted! DIY How to
Nissin CBR Honda brake caliper upgrade How to DIY
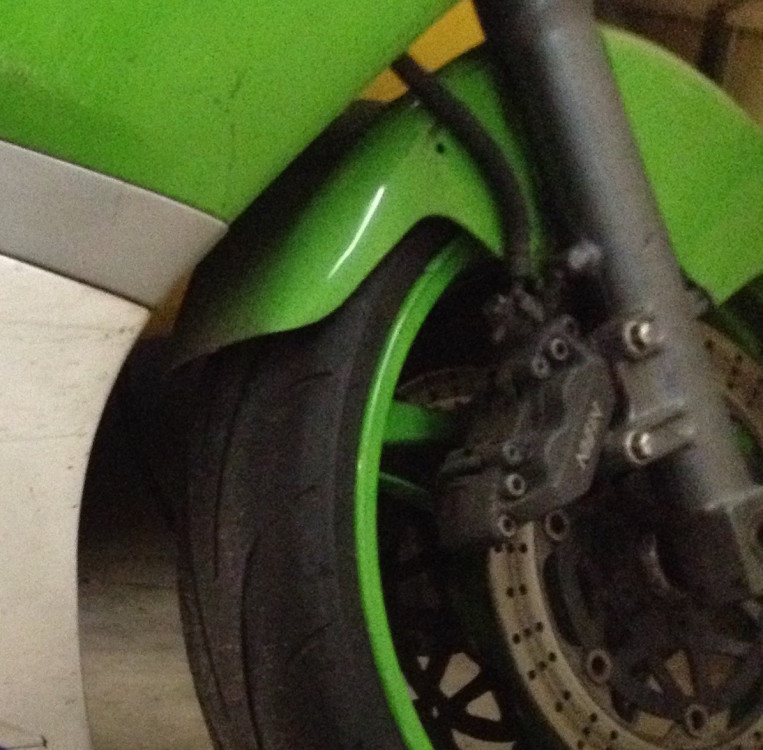
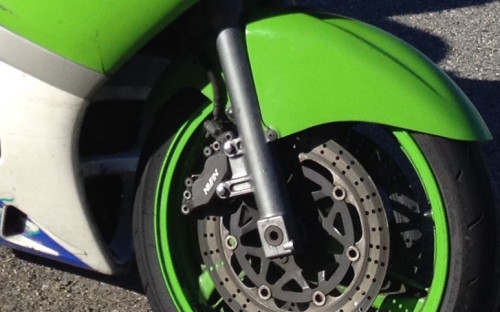
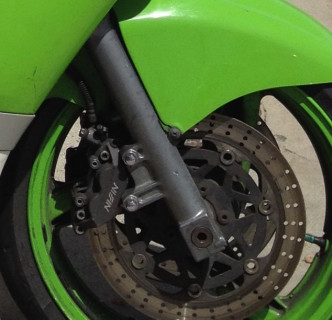
I bought a complete set of Honda CBR F4i front brakes for just $20!
That included everything, the calipers, Master cylinder, all brake lines, pads, and even the lever at the m/c.
I wound up combining them with the stock ZX6E brake lines, master cylinder and brake lever. Was just a little easier that way to install.
Took some grinding on the fork tubes with a file in two places on each one, plus filing down the Nissin calipers themselves in one spot and removing several nickel thicknesses there, and I also had to deal with the different bolt in sizes.
I opted to tap out the Nissin caliper holes and use the stock ZX6E brake bolts to their tubes. This way is safer I believe and also I can swap back to a stock setup quickly in a pinch. No shouldered bolts for me.
I borrowed a friend’s M10 1.25 pitch tap and that did the trick.
Posted in DIY, repair and tagged brakes, nissin, upgrade. braking, Zx6e, zzr600 by green
New Clutch in! Stator cover fixed, new paint 49,469 miles
Finished the bike re-build yesterday in a few hours! Was pretty easy, everything went smooth.
I had to wait until now, a day later, to test fire it.
A few spots of Permatex RTV at critical gasket areas, and it need 24 hrs for full cure. This time I want no mistakes… no leaks.
So… on to that test… was quite nervous I might have botched something somewhere or clutch wouldn’t work.
But I got it running and it sounds quieter at all revs, noticed it right away when it fired at 3500 rpms. It idles smoother. I know I must be crazy but I know Green Magic pretty well at this point too, so it seems very true.
Might be due to switching to 5W-40 Shell Rotella T6 synthetic oil. Only been running dino before. New better filer installed too, a Purolator Pure One 14610 unit that is better filtering than most of what’s out there.
Clutch IS working. And I have full cable adjustability back. In fact, near too much the other way, lol. Love it.
Warmed up bike on center stand for 10 minutes only so far to ‘set’ that RTV sealant, and check for any leaks and clutch operation.
Even though it wasn’t a huge repair, I was still nervous hitting that starter button. Going for ride later today after a little fairing clean up and reinstall of left mid and lowers.

Before:

After:

Posted in repair and tagged New clutch, repair, Stator cover by green
Stator Cover rebuild, JB Weld crack
Just started (finally) the stator cover project. Bike had been downed, lowsided on the left from previous owner when I bought the bike 2 years ago. The light oil leak has been just annoying. No noticeable drop in oil levels between changes, but a mess maker.

Here’s the original shape. I thought there was only a tiny tiny crack in the bottom, but when I finally pulled the cover I saw from the inside there was a long 2.5″ crack where the two planes meet at the bottom. Much larger than I thought. Cue the JB Weld. I used the original steel reinforced resin formula, not the quick dry stuff.
I first sanded a little inside and outside to rough up the surface and then cleaned / degreased with brake cleaner.


JB welded inside cover and let it sit overnight, and then JB Welded the outside of the cover next. I globbed a lot on, really the leftovers from the mixing process to fill in some of the ugly surface scratches. Yeah you could bondo it, but this is high temp and oil safe, had some left, and figured why not? It’s sandable right?

Sanded down the JB Weld. Cleaned again with brake cleaner.
Sprayed about 5 light layers of Dodge grabber green rattle can paint over it.
It’s a HUGE improvement for the looks of the bike, it was so ugly before and befouling the middle and rear of the bike with oil and then that attracted and locked in dirt and grime. Gross. And sprayed on my left boot too, and that was annoying. Hopefully I cleaned oil off my boots for the last time!

Painted dodge grabber green:

Installed!


Posted in repair by green
How to replace Clutch on your ZX6E Ninja. Easy, step by step how to DIY
In my opinion, this is a very easy job and not much harder than changing oil or spark plugs.
Easier Tips: An easier way to is drain your oil. You can gangster lean the bike a lot towards the kickstand side of bike. I’ve read pushing bike onto 2x4s and using sidestand should make it not leak much when you pull the clutch cover, but I was near my oil change interval anyway, and figured I’d rather have more secure stable bike to work on, on the centerstand.
I also pulled my clutch lever in, then held the lower clutch lever down below on right side in place with a short 2×4, and disconnected the cable at the handlebar. I then rotated the lower clutch release rod, it’s attached to the hinged lever down on the lower right bottom of the clutch housing where the clutch cable hooks into. The rod is inserted up inside the clutch housing. Rotate the rod gently to free it, and then slide the rod out the bottom of the housing.

1) Drain oil (or not – see above)
2) Unbolt the clutch cover.
It’s the lower right large cover on side of bike, where your fill up your oil. There are about ten 8mm sized bolts you need to remove here. With the old gasket installed, it may be a little stuck on there, I gently, and I mean gently, gave it some taps with a 2×4 scrap to help free it.
3) Remove the cover.
Voila! you’re looking at your clutch assembly. Yes, it’s this easy.

4) Remove the five allen bolts that hold the clutch springs in.
They are long bolts and unscrew slowly, so don’t worry the springs aren’t going to shoot out at you or anything. You now will see your clutch metal plates and friction plates all stacked in on the clutch basket.

5) Remove metal plates and friction plates.
Just pull them out with your hands. Keep track of the order of them as you remove them and stack them. Basically, they alternate a friction plate, a metal plate. 7 friction plates in total. These are what you will want to replace with your new clutch kit (along with springs most likely). My inner most one was worn to 2mm, way too worn. They need to be at least 3mm, and a mm here or there spread out over so many plates adds up! (That’s what caused my clutch release rod to slip out, not enough thickness overall to the clutch plates due to wear. And picky shifting needed with the clutch this worn. I had lengthened my clutch cable {loosened} it to the maximum length and had nothing left.)
Look at your metal plates too. If you cannot see the little ‘dimples’ in the plates, they are almost certainly too worn down. 
 The divots just give the oil a place to hang out, and help keep the plates lubricated and freer. Check for excessive wear, and warpage. Easy way is place the metal plates flat on a piece of glass and try to slide some thin gauge feelers under them at numerous spots. Anything over .05mmm means they are warped. You should consider replacing warped or very worn metal plates. Otherwise, most people sandpaper the surfaces a little to scuff them up and reuse them.
Here, I scuffed the metal plates up with Emery cloth ‘fine’ sand paper:

6) Soak your new clutch friction plates in your motor oil for at least 30 minutes if not longer before installing, this helps avoid excessive wear on the dry plates on the first startup.
7) Remove all the old gasket material on the cover and the motor side.(I carefully used a razor blade).
8) Reinstall your new friction plates and metal plates alternating. The final outside plate does NOT go in the same deep slot grove in the clutch basket like the others do, rather it gets rotated slightly and fits in it’s own separate tab.  You can see that outer shallow tab opening in the above clutch housing photo above. See where the red line is pointing to at the top (not where the white text bubble has a small pointer). This is important to get this correct to avoid clutch slippage later.
Replace your new springs unless you decide to use your old ones.
9) Fit your new gasket (or something like Permatex gasket maker), and mount the cover and rebolt it in. I make my own from FelPro gasket paper.
Here are my new friction plates installed. Notice the outside friction plate is aligned in separate cutout tab in the clutch basket.


New springs and cover installed:

Reinstall your clutch cover and tighten according to the torque specs, which are 8.8 Nm or 78 in-lbs. They are not super tight. Push back in your clutch rod if you removed it, make sure to gently insert it and rotate it so it catches on the clutch release pin under the cover. Also, hook back up your clutch cable if you released it.
If you drained oil, add new oil. Make sure to not sure regular 10W40 auto oil, it has friction modifiers which can make the clutch slip.
Now make sure to adjust your clutch cable as it will be different from a worn out clutch. Adjust at both the handlebar and by the clutch housing the cable adjusters.
You can find special motorcycle Valvoline 1040 wet clutch safe oil, for example. I’ve used that the past two oil changes but I decided to switch to pure synthetic oil this time around doing my clutch to Shell Rotella T6 5w40 diesel oil. I’ll post on this blog how I like it, I’m hoping to have cleaner, smoother shifts!
UPDATE: I love the new clutch and I’ve ridden several thousand miles on it with the new Rotella T6 synthetic oil. I have much much smoother shifts with the new clutch.
Posted in DIY, repair and tagged clutch, clutch plates, DIY, friction plates, how to, Kawasaki, Replace, replacement, yourself, Zx6e, zzr600 by green
Replacing clutch, stator cover crack fix, synthetic oil
My clutch slipped when I got the bike at 43K. I adjusted the cable all the way OUT, and that finally made the clutch slipping over 6K revs stop.
However, if you checked out my Yosemite report, you know the clutch release rod fell out close to home on my return after 530 miles on the road. This I verified today was from the clutch being worn beyond service limits. The friction plates must be about 3mm thick and my last inner plate was down to 2mm. With 7 friction plates and 6 steel plates, a little here and there makes a huge difference.
In fact, clutching has always been, well, a drag on this bike. And got worse. It takes lever finesse to launch the bike and especially at higher revs, it’s very easy to botch a shift. Takes a lot of focus.
I am in great hopes the new clutch solves this issue, I know it will fix the rod slipping out.
Had originally planned to just do the clutch and tip the bike hard on the left, but eventually decided to deal with stator too, and the oil and filter were changed not 2000 but 2500 miles ago and I drove through 8 miles of fine dusty dirt so might as well drain it all and switch over to synthetic Shell Rotella T6 5w-40 diesel oil now with a better filter than I’ve been using, a Purolator Pure One PL14610. Have to go get those parts too. This will make doing the clutch neater, since the oil won’t gush out of the cover too.
Getting a number of my to do things done! Especially the cracked stator cover. Was cracked ever so slightly as purchased, and has leaked a little bit of oil continuously for two years. Very aggravating, especially on my new Sidi boots! Makes a mess on trips over 30 miles. Also helps the rear end of my bike look awful, oils it up and grabs all the dirt it can on the road.
Unfortunately, I have to wait for parts from cross country, so in the meantime I decided to dig into my stator crack issue, and my CLUNK on startup creepy issue. The CLUNK no start has become more frequent. And some screws in the washing machine noise behind the stator cover too a couple times while trying to start.
I expected to find broken starter gear teeth under my cover, but the large started gear, the idle gear, the starter small spline gear, and the other gear all look fine. Don’t look excessively worn, and no broken teeth to be seen.
It’s often the case the starter one way clutch is bad, but it seems ok, in that the starter will only spin one way and lock up right away from spinning back as it should.
So am scratching my head here as to what the super CLUNK cause is.
The hardest part of the clutch job and the stator cover removal is simply removing the old gasket material with a razor blade. Quite time consuming. Just the clutch replacement on its own is a simple breeze of a job, could be done quite quickly in a couple of hours.
Posted in repair by green
Oil change #2 46,931 miles. Epoxy stator cover.
Oil change today and while there finally trying to stop the one drop of oil a day coming out of stator cover on teenie hole from p.o. lowside. Also for some reason riding w newer thinner boots its spraying a bit on them on the hwy which is making a mess and annoying. Didn’t on older lg work boots.
Planned to use JB weld but couldn’t find it. I found some Loctite quickset Epoxy. Two part plunger style kit. Says waterproof tight bond for metals, wood etc…
Not sure if that can take high temps around motor.
Drained oil and changed filter and will leave empty for a day. Used brake cleaner to clean outer cover and then epoxied hole.
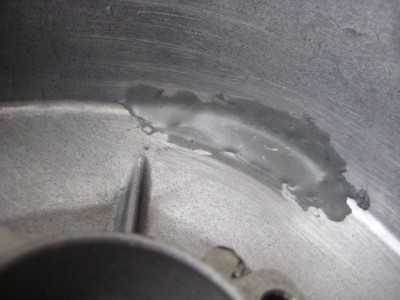
Shot of leak area when I got the bike 2 years ago. You can actually see leak in above pic in the oil pool you can see hairline crack on right side coming out of pool.
For those interested, this pic is area cleaned and the crack as it is two years later and 4K. I don’t think its spread like I’ve read it can. It’s center frame on cover where two edges meet and you can see sun lighting up the tip of crack. Man, tiny but what a mess maker over time and miles. Sheesh. Bike is a dirty birdie all cause of this and you can hardly see it with the naked eye. Only under bike incredibly close staring at it.
Hope it bonds tight. Otherwise JB Weld next and then new cover.
Posted in repair and tagged JB Weld, Stator cover by green
“The Duct Tape Method” DIY change tires motorcycle yourself without tools! How to
I double taped about 2-3 inches or so on about 16″ strips. So lay out long strip and cut a short piece and tape over it so the two sticky parts lay face together stuck together. Why? That’s the part you line up with the tire inner bead part. This way you can pull it out easily and fast after tire put on.
CLICK pic below to see my video here:
I taped the sticky long half under tire pressed two walls together – which is SUPER easy with the Q3. Mine was soft as butter after spending about 6 hours inside a normal temp apt. Did it with a finger and a thumb it’s so compliant.
Space those tape points roughly out the same. Then I used just a little dish soap and water mix around the tire and wheel half where I’d have to push.

I got it about 65% on and it started getting very tight. This is where I said in my head “there is no f-ing way this is gonna happen” But I made sure the already mounted portion was snug squarely in the center of the wheel and therefore its smallest radius. In fact I kind of man handled it pretty good and stuffed it and made sure it was snug in there. That made a big difference – even though it looked the same before, it wasnt. Smoosh that tire up in there inside that middle part of the rim!
Then I pushed on both sides of last 35% of tire and in about 30 seconds it just plop! Slid right over the wheel rim!
I was shocked that worked. Aired up a gas station to about 70 psi and got 95% of bead perfect in. 2nd to last bead I had to bounce a lot and more air to 70 and it POPPED in loud. Didn’t want to go higher air pressure and bounced it a lot, finally tossed in my car trunk with one last part not fully seated – although holding air just fine for now. About 25 minutes later it had seated itself perfectly. Aired down to 40 lbs and voila! New tire!
(The old tire I chopped up a lot before breaking the bead – not good. Not recommended, break bead fully first! Although by slicing through one entire sidewall and having 2 separate parts I was able to dismount the tire with my bare hands and not much force. This is coming from the guy who can hardly center stand this bike so I’m not the most ripped person on earth I’ll tell you that! Think computer user body build). No irons no spoons NO rim damage!
Finally broke both beads on the front tire. Was at it 1-2 hrs. So before I forget, I’ll post tips.
I borrowed two craftsman bar clamps with the squeezy grips. Another C clamp style one was worthless. These two is what I needed. The 8″ wooden angle changing one that Pengaru has in the tire change DIY sticky would be a lot better.
Set both clamps about 4-6″ apart on wheel. I tried and tried and tried. Was about to give up. And I recalled how I chopped through rear tire. 
So I sawed horizontal cut through front tire, and was able to push in tire. And I coated inside it up a lot with water and soap and that’s what finally enabled me to break it free, lubing inside bead and tire area. If you have trouble with clamps do that and it will help a lot.
I didn’t have an easy ability to make the wooden 2×4′ eight foot lever using a car thing, next time I’d prefer to try that or get the wooden clamp. This method was a lot of grief.
(I couldn’t push this one off like the rear, wasn’t even close to going. Tried clamping sidewalls together and that’s closer but not close enough.)
Wow, getting old tire off and new on was easy! Not really harder than rear wheel.
I used DUCT TAPE again to get old tire off and new one on. No extra cutting.
Now just need to air up

Edit: I put the f ing tire on the wrong direction this time. I was so pissed.
I just had to completely redo it BUT it did go smooth once re duct taped it again AND I shot a video of it this time. Should not have forgotten to check direction. But at least its on and right direction.
I’ve just slipped both sides together off the rim with duct tape. A milk crate underneath works great for protection.
(I did remove the right rotor but don’t real need to if you’re careful. Next change I won’t bother).
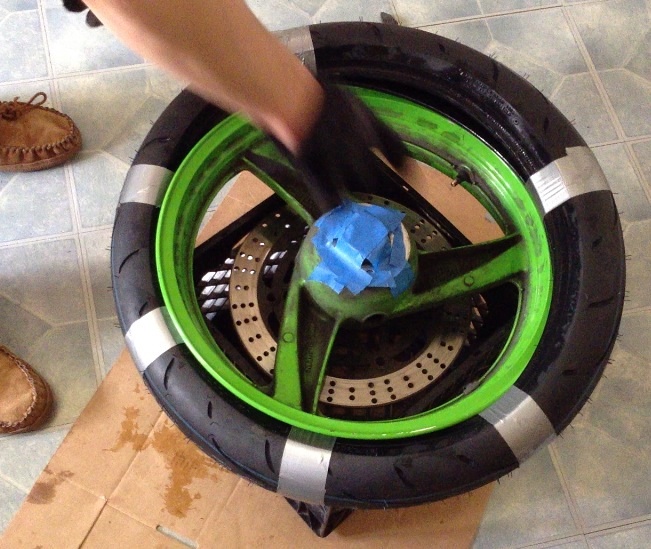
This is how I duct taped the tire beads together to slide it off the rim (didn’t take a ‘before’ pic).
I did actually use a small zip tie to fish the first piece of duct tape between rim and tire. After first tape piece is in its much easier with more space to work. Notice hacksaw cut for applying inner lubricant for breaking the bead step earlier.

The brand new tire all taped up and ready to try installing. This was my first attempt on a front wheel ever and it went on a lot easier than I thought. I recommend duct tape because its a wider band and will potentially cut less into new tire than a zip tie, not scratch rims like a lever could and most people actually have duct tape on hand!

I made my own little wheel balance station like this below. I leveled (with a level) side to side and front to back two milk crates on a small table and then used the actual axle to mount the wheel and spin the wheel. It’s more like you try to find the heavy spot, and raise it from the bottom up 90 degrees to a 9 or 3 O’clock type position (horizontal heavy part on wheel down), and let it fall. Keep adding weight until is does not spin down at all. I used very strong magnets for this to the rim, adding 1 at a time.

I wound up being 1.3 oz out of balance on the rear wheel, and fine on the front wheel and made no adjustments there. About a month and, um 1200 miles later, finally got peel and stick wheel weights and installed 1.3 oz on rear wheel where I had marked it with tape.
Posted in DIY, repair and tagged change tires, duct tape method, no tools, Zx6e, zzr600 by green
Oh damn! I just fixed my clutch 43,935 miles
Yup, i finally ‘loosened’ clutch cable adjustment instead of where it was when I bought it, or let tightening it which I tried before and was an utter failure. I can rev past 6,000 rpms now! Hit 8K + doing loop around Lake Merritt just now, not planning to hit 14K anytime soon, especially as I discovered no coolant in the thermostat / cap area. But great development! Thought I was going to have to replace the clutch next.
Posted in repair by green
Replacement regulator in!
At 43697 miles I think charging issue solved. I popped in a used 2003 Kawasaki ZR7S regulator with 13,382 miles on it, for $39 with free shipping.
It’s the same unit a SH650A-12 model.
Drove it about 26 miles yesterday after installation and my dash lights and particularly blinkers in dash have never been so bright! Also my horn is about 2x louder than it’s ever been, so I am hoping this solved the problem!
Posted in repair by green